Thursday, 31 March 2011

Leaky Cauldron......The Bar Counter, Again!!

As I made such a mess up trying to edge the bar I had to buy another rail and start again. Of course I could not find the same one quickly and locally, so I bought TWO lengths just in case.
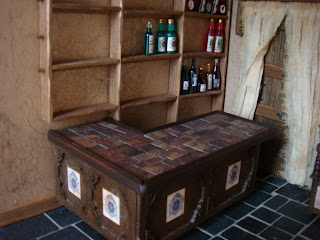
 I finally managed to edge the counter, mitres are definitely not my strong point, and painted it a glossy dark brown. 
 I have topped the counter with 'slate' tiles. These have been cut out of normal DIY floor tiles that I had left over from a previous project. 
 I am much happier with this finish.
The main problem is the height. It is slightly lower and sits below the shelving that was sized for the other bar counter. I will have to see what it looks like with the rest of the furniture and my good time witches. 
I have also given a home to a very street wise ginger moggie.
 I hope he has come on his own and not brought unwelcome house guests!!
 This disreputable character was made by the very talented Sally of Miss Sally World and I think he is just right for Diagon Alley.
I have been grunging the Leaky Cauldron today....hmmmm, I think I might have been a little it too enthusiastic with the grunge. Will show tomorrow and see what you think. 

Wednesday, 30 March 2011

I Am Sure There Is A Better Way!.......

I decided that the standar shop door that came with my Sid Cooke house was definitely not right for the 'Tudor' look of The Leaky Cauldron. I remembered reading on a blog that sometimes we can use what we already have as a base and work with it.
So I sanded down the original door and covered both side with strips of balsa. Trimmed and distressed with my trusty tapestry needle.
One of the reasons I kept the door was to be able to have the central window looking into the bar. I am hoping that the surround will hole the leaded window in place.
 As I have still to begin the windows I only finished off the interior side. After a lot of tweaking and sanding the door fitted snugly into the doorway.
 Flushed with success I stained and sanded the door again. I even remembered to test the length of the door to make sure it would still open across the interior slate flagstones.
The finished door has a much better look but it is slightly thicker than the original which did cause problems with the hinges which I haven't quite sorted out yet because the tiny flat head screws have disappeared! For a temporary solution I have used some others but they will have to be changed......when I find the others!
Karin has given me some very good advice about using balsa for tricky shapes and sanding so I will be slightly less amateur in my next attempt at door bashing! Thanks Karin.
In the post today I received a parcel of goodies from the talented and generous Glenda of undancey minis who is streamlining her collection.
 Glenda decided to sell her vampire collection with some wonderful pieces by artists like Ericka and Nikki so I had to have them for my Apothecary shop.
 Glenda also popped in some extra goodies that she knows I will definitely be able to use including a couple of her rugs and gorgeous little baskets. My real favourite though was the tiny, and I mean tiny, delicate pouch/purse which is just perfect for one of my witch's shopping baskets.
 Thank you so much Glenda for my fabulous parcel which I know you have taken the time to send during the very stressful days New Zealand and all its families are experiencing at the moment. 


Tuesday, 29 March 2011

The Leaky Cauldron....Not Again!!!

After the trauma of running out of rail for my bar counter I was ready to commit murder when this happened....
 The front door of this kit is a sliding panel, well it can be glued in place but interior access would be limited. I have spent a lot of time trying to decide how to finish and fix it and finally settled on all brick as a contrast to the render. 
Painting the facing edges in sand yellow was the first mistake. It's much too yellow but it can be changed pretty simply. 
The front step has to be glued in place in front of the sliding panel but not too close otherwise the panel will stick. As usual the piece has to be sanded down to accomodate the paving but I am used to this now.
The brick paviors go down very nicely, all easy peasy, but as you can see the step is unfinished because I was short by about 20 bricks. Grrrrrrrr!!!!!
 So now I have to order another pack and wait for it to arrive which is so annoying but the worst thing is I can't remember what type they are so I have had to order the colour I think is right.......and we all know what is going to happen! Oh well that will teach me not to make a note of these things. If worst comes to worst I will have to exchange them when I go to Kensington in May.
 I did, however, have enough bricks to complete the panel and the door is hinged and sort of hanging correctly.  
I have still got to decide what to do with the door mouldings. The ones that come with the kit are made in MDF which colours very differently to the balsa I have used everywhere else. At the moment I have painted it a very dark brown as a contrast but I am toying with the idea of making up my own and staining it to match all the rest. 
The only thing that puts me off is the circular piece that goes around the fan light which I didn't do very well with inside.
 This was my second attempt as the balsa hates being cut against the grain and kept splitting and splintering.
I am putting up with this attempt as it will rarely if ever be seen, don't tell Michelle, she will be horrified by such a shabby approach!!! Ha! Ha!
The door is also a little darker but in my defence it is much more sheltered from the elements inside the porch so it would not weather as badly!!!
Still hoping to have some time this week to play with the leaded windows.

Saturday, 26 March 2011

Leaky Cauldron Front Panel.....Nearly finished Exterior!

I finally started the opening fron panel this week after finding the extra sheets of wallpaper I needed at Miniatura. 
 I wallpapered the inside of the door and begin working on the balsa beams. I decided to work slightly differently this time to try and cut down on the amount of time it usually takes me. Plus I wanted to get the windows done, no hanging around.
 I cut all the pieces I needed, including the windows. Then glued on my lines of brickwork. While they were drying I distressed and stained all the wood. I always cut the wood slightly longer than required as by the time all the sanding and staining is done it always ends up smaller. I have learnt to my cost that you can always shorten but never lengthen!! 
 The lines of bricks have to be grouted once the PVA is completely dry and this time I remembered to give them all a PVA wash. This seals the bricks making them much easier to clean up when grouting.
I left everything to dry overnight and in the morning glued on all the main beams and window frames on the outside. 
Once all the glue had dried I applied the texture paste with a small trowel and various brushes. It needed to be a thick layer and I wanted it to squidge right up to the beams.
It is impossible to do this without getting the paste on the beams but I cleaned up as I went along.
 While the paste was drying I began building up the interior window frames, sills and shelves. As I had used quite thin balsa, 1/8th of an inch, I have tried to strengthen the ledges and shelves by adding extra  pieces and strips.
 These windows have worked out much better than the side ones, mainly because I put them together all in one sitting and the larger sills are cut into the shape of the walls. The side ones simply have the sills laying on the top of the window ledge.
I am hoping to have a go at the stained and leaded windows next week and finish of the door panel. 
Getting there bit by bit......Then the really scary bit, the grungy, weathering wash of everything!
Oh, and pave the front area too of course and tweak and twiddle all those little bits that never look quite right when the kit is finished.
Then I can put everything back in and try out the lights, play time!

Friday, 25 March 2011

How to Make a Lady Swear!!!!!

The bar counter for The Leaky Cauldron has been glaring at me for a while now. It was a basic whitewood piece that I purchased on Ebay. I cut it down to size, removed the plain top and added a thick piece of painted and distressed balsa. The top was supposed to look like a solid wood counter roughened with wear and use.
Ever since I put the top on I have hated it! Balsa wood is fabulous to use but the thicker pieces have a horrible edge that soaks up paint and is resistant to all my very basic tools. I haven't been able to get the colour right and the nasty edge is all I notice every time I put it in place. 
 So, with a hundred and one other tasks to complete, I removed the top and sanded all the glue off.
 My idea was to make a new top with a framing edge. This new edging will hold slate tiles and I can stain it all up nicely. Much cleaner look, nowhere near so dominant.
I found a left over piece of banister rail which proved perfect as I could just slide the top along the pieces of balsa.
Mmmmm.....am I the only one to whom moulding measurements and angles are a complete mystery. I measure, I plan the angle, I cut and I never seem to have the right angle or my lengths are all wrong. So I try again and again. 
 Eventually cutting of little bits at a time I manage quite a decent corner and even get the longer length of the front of the bar sorted.
Gosh, looking good and very chuffed with my carpentry skills I reach for the remainder of my banister rail.......
 ......the whole inch I have left!!! Why, oh why does this always happen! There are am feeling very pleased with myself and I have even saved money by using a left over piece and now I have to buy another piece of rail, travel to the shop and in the meantime forget how I managed to cut and angle the thing!! 
Swear?! I am surprised none of you heard me!!!

Tuesday, 22 March 2011

Well, They Were on the List!!!!

It's time to come clean and own up to a couple more purchases at Miniatura. Lots of comments on my last post congratulating me on being a good girl at the show, so in my defence these were on my list!
I could not go to a show and not look out for another character from the wonderfully talented Julie of Bellabelle Dolls.
As usual Julie had a lovely selection on her stand and I chose this little witchy. 
 Looks like she has made a purchase at Flourish and Blotts and is heading back to The Leaky Cauldron where her older sister is having a nap.
 She is a pretty little thing and definitely a member of the Weasley Family!
I was also very pleased to see Julie still had some of her mirror ghosts for sale. I had the perfect place for 'Charles'.
 He fits perfectly into the guest bedroom above the fireplace. 
As many of you know Julie has been invited to show at the Tom Bishop fair in Chicago and  lucky Jain  is going to accompany her. Wow, what a fab opportunity and they are both so excited, although Julie is a bit terrified too!
I am sure Julie will be a huge success and her dolls will fly off her stand but I hope she will have a few left for Kensington in May!
Lastly how could I resist this little Dumpty for my toyshop?!
I have been collecting nostalgic toys from Sally Reader for my toyshop for a couple of years now. They are so well made and remarkable value. I have a Magic Roundabout set that always makes me think of tea time with my family when I was an awful teenager! I then thank the light that my own teenagers are sooooo much nicer!!
Oh and I did manage to get a couple of sheets of wallpaper to finish off the walls of The Leaky Cauldron. The stand I had purchased the wallpaper from was not at Birmingham for this show as the stand holder had had a recent operation. I then went round all possible stands looking for something that would match up, impossible.
Then just as I was thinking of going home I saw packets of wallpaper on a stand selling fireplaces and they had two sheets!!! Perfect end to a lovely day.

Monday, 21 March 2011

Back from Miniatura....Lots of Goodies

This weekend I had a lovely trip to Miniatura at the NEC in Birmingham. This very large miniature show takes place twice a year and is a fabulous place to not only buy lots of gorgeous goodies but get lots of ideas and inspiration. 
I have been to the show for the last four years and really enjoy wandering around along with lots of other people who share the same enthusiasm. Everyone is so friendly and I always end up having a chat and sharing ideas.
There are also lots of artisans who only attend the larger shows and do not have websites so this is the chance to see their pieces.
 My first port of call was Anne's Fine Design stand. I have learnt that you have to get to this stand very quickly as Anne has a deservedly high reputation and her popular pieces sell out. I wanted an owl this time, obviously for Diagon Alley. This is the one I chose. 
 I was very glad I went there first thing as the stand was already crowded ten minutes after opening. Anne makes all sorts of animals from sheep to monkeys and she will even make a miniature copy of your own pet. Lots of customers commission Anne to make these very personal pieces.
 He looks perfect sitting atop the Michael Mortimer owl stand I have had for a while. I love Michael's pieces so I headed off to his stand next as I wanted to see if he had a table and chair for The Leaky Cauldron I had seen at a previous show.
No table but...... 
 A lovely tall cupboard, perfect for the guest room.
 All Michael's pieces are perfectly proportioned and finished. The internal shelves are calling out to be filled with wizarding goodies left behind by previous guests.
As Diagon Alley is the shopping mecca of the wizarding world all my gorgeous people will need baskets brimming with shopping. I have not got any wicker or cane baskets so they were top of my list.
These fabulous items are from C & D Crafts whose stand was full of lots of handmade items at really reasonable prices.  
 The two baskets are the perfect size and I could not resist the pet carrying basket. My Hogwarts pupil will be able to use this to take her cat on the Hogwarts Express.
 I have been collecting these marvellous cats by Sarah Schiff of Pocket People for a while now so I had to buy this cheeky kitten as soon as I saw him. He is a new design she has just started making and he is simply gorgeous.
He looks so at home hanging on the basket but Sarah suggested I hang him from a cauldron handle, perfect!
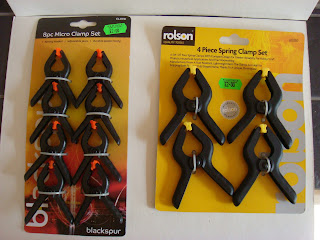
The show is also an opportunity to look out for helpful items and when I saw these I thought they would come in very handy.
They will be perfect for holding things in place when building or gluing and I have not seen them in my local stores. Plus they were a bargain!
I thought the show itself was a lot busier than the October show and a lot of the traders seemed to think so too. I did think that there were less sellers than usual though and a lot more stands seemed to have more mass produced items rather than unique pieces. 
It remains, however, a fabulous day out and well worth the two and a half our journey. All these pieces also come from sellers who do not have websites and I do like to see their new work. 

Thursday, 17 March 2011

Leaky Cauldron Side Windows.....

This week seems to have disappeared very quickly. Not sure why apart from the birthday of my eldest son and I have been attempting to start spring cleaning. God, I hate housework! 
I think I have also been finding reasons to put off working on the windows of the Cauldron.
 There are two side and two front windows that I want to look like the square, over-hanging Tudor windows you see in some remaining 17th century English High Streets. I did make some a while ago  for the witch house and I remember they were a nightmare.
So balsa wood to the fore I set to. The main problem was the thickness required for the window shelves and 'roofs'. They had to be quite thin, I settled for 1/16 of an inch, but trying to distress them proved a little trying. I split at least four trying to age them, usually when I was just about to glue them in place!
 Eventually I managed to get them all the pieces in place without too much glue or heart ache. 
 I have added beams above and below each window to increase stability and make sure the deep window sills don't warp or droop.
 Ignore the mess inside, the decorators are in! I have used a walnut wood stain for the base colour of the outside wood which I have rubbed with a normal baby wipe. When all the outside wood is finished I will add a dirty colour wash mixed with PVA to seal it all. 
 To make sure my window panes stay in place I have cut out a square block down each main post. I am hoping that the leaded window acetate will go in nice and easy after I have given all the wood their wash. Hmmmmm, we will see!!
 I am going to try and make my own 'leaded' window acetates and see if I can create a stained glass look.
The great thing about these windows are the deep sills of course, more room for mini goodies! As long as they are not too heavy of course.
Off to Miniatura on Saturday. So excited, I love looking at all the fabulous work created by such talented people. I am on strict instructions from my husband this visit with a third child about to go to university in September, I must resist impulse buying.
He is right of course, so I have promised to be good and stick to my favourite sellers and of course my list!