Showing posts with label Leaky Cauldron. Show all posts

Tuesday, 12 February 2013

Take a Bow, I Have Finished a Whole Room....The Leaky Cauldron

Today I have put in the last finishing touches to the bar of The Leaky Cauldron and tacky waxed in everything. This is it the room is officially done. There will be no more tweaking, primping or procrastinating, I promise to leave it alone.
The bar is open for business.
Three changes since yesterday: the blackboard showing all the Leaky's Specials, a very un-PC goblin head by Debbie Lyons and one of Sarah Hendry's wonderful cat sculptures.
This room has taken shape after two years of collecting and planning so I hope you will enjoy my walk through of all the different areas and perhaps discover a new miniature artisan.
These three raucous hags are all by Jain Squires, I adore Jain's work as it is so quirky and each doll is beautifully dressed. 
They are celebrating a birthday and have certainly taken full advantage of all the the Cauldron's hospitality. The poor cat, from Miss Sally World,  is exhausted by them. 
 I always find it really hard to begin piecing together each little scene as it will mean 'spoiling' a piece of furniture that it may have taken a while to source. So I thought long and hard  about my celebration table and asked the extremely talented Linda Cummings to create a Hag's Birthday Cake as my centrepiece. Linda is a real artist and we had lots of email discussions about size and design using photographs from the internet.
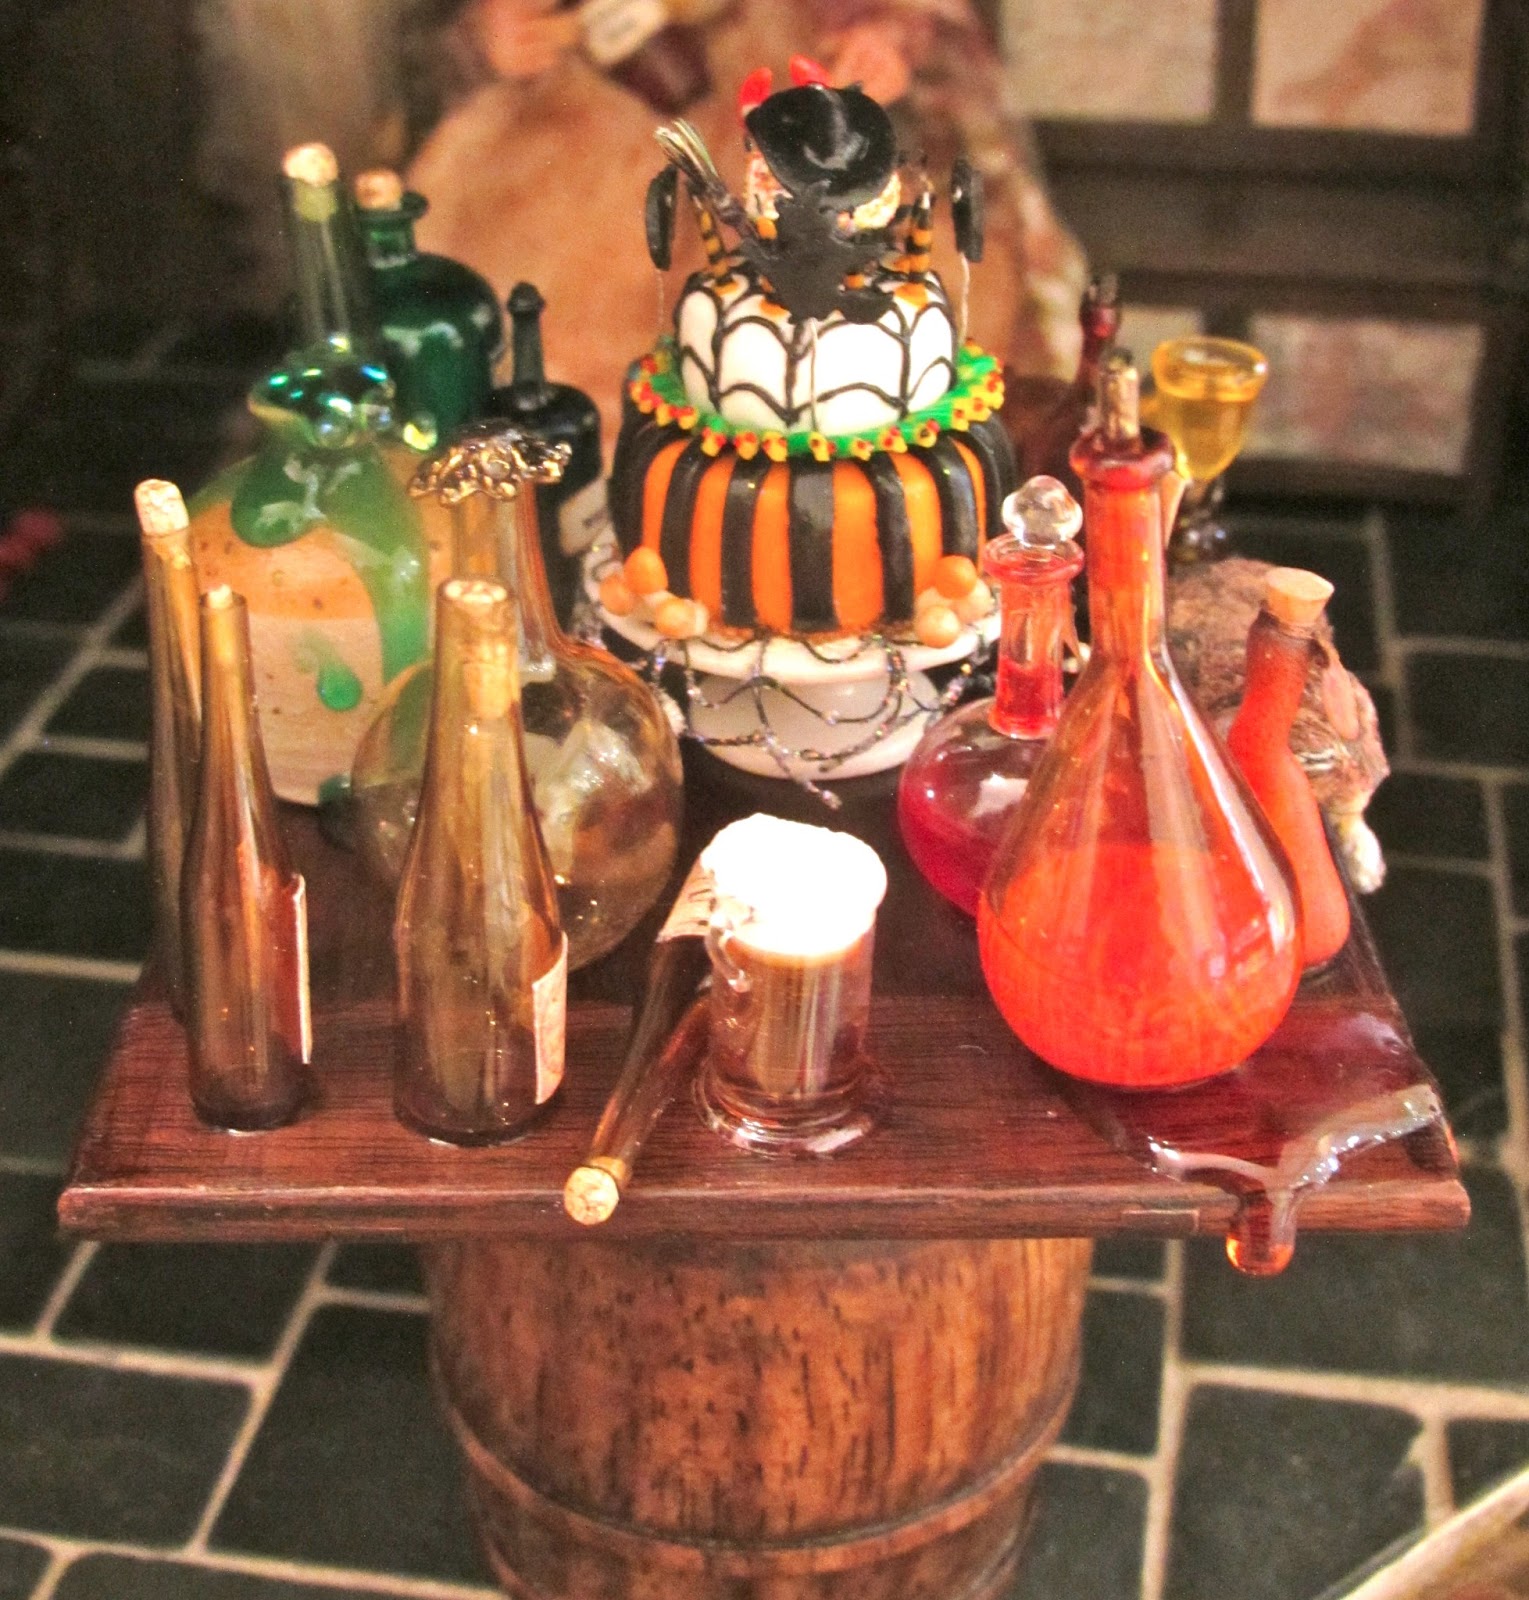
 As you can see Linda has created an absolute masterpiece that stands proudly above all those empty bottles!! The top of the cake has a crash landed witch with her red slippers and broom with actual bristles!! There are striped candles and flying bats as well as mushrooms and grisly fingers. Wow!! It is a total work of art and I am so glad I approached her at the Kensington Festival. Lin is a very talented lady who is so enthusiastic about her work and I feel truly honoured to own such a unique piece. Many, many thanks Lin.
 I have spent a lot of time trying to source bottles for this project and ended up buying quite a few off Ebay.com simply because of their shape, then I went to the Alexandra Palace Fair and was able to find quite a few there for a fraction of the cost!!
 I have also bought some gorgeous handblown miniature glass pieces from Glasscraft at various fairs. Although do check the size of the decanters necks if you are a solid water beginner like me. All the glass can be coloured with glass paints and I opted for this method too.
Ray Storey not only makes fabulous lights but also a range of very intersesting hand blown glass and I have used a number of shapes and colours, brown and green have worked really well.
My Tiny World also has a quite a varied range of glass, mostly jars, in all sizes which are of a lovely quality. 
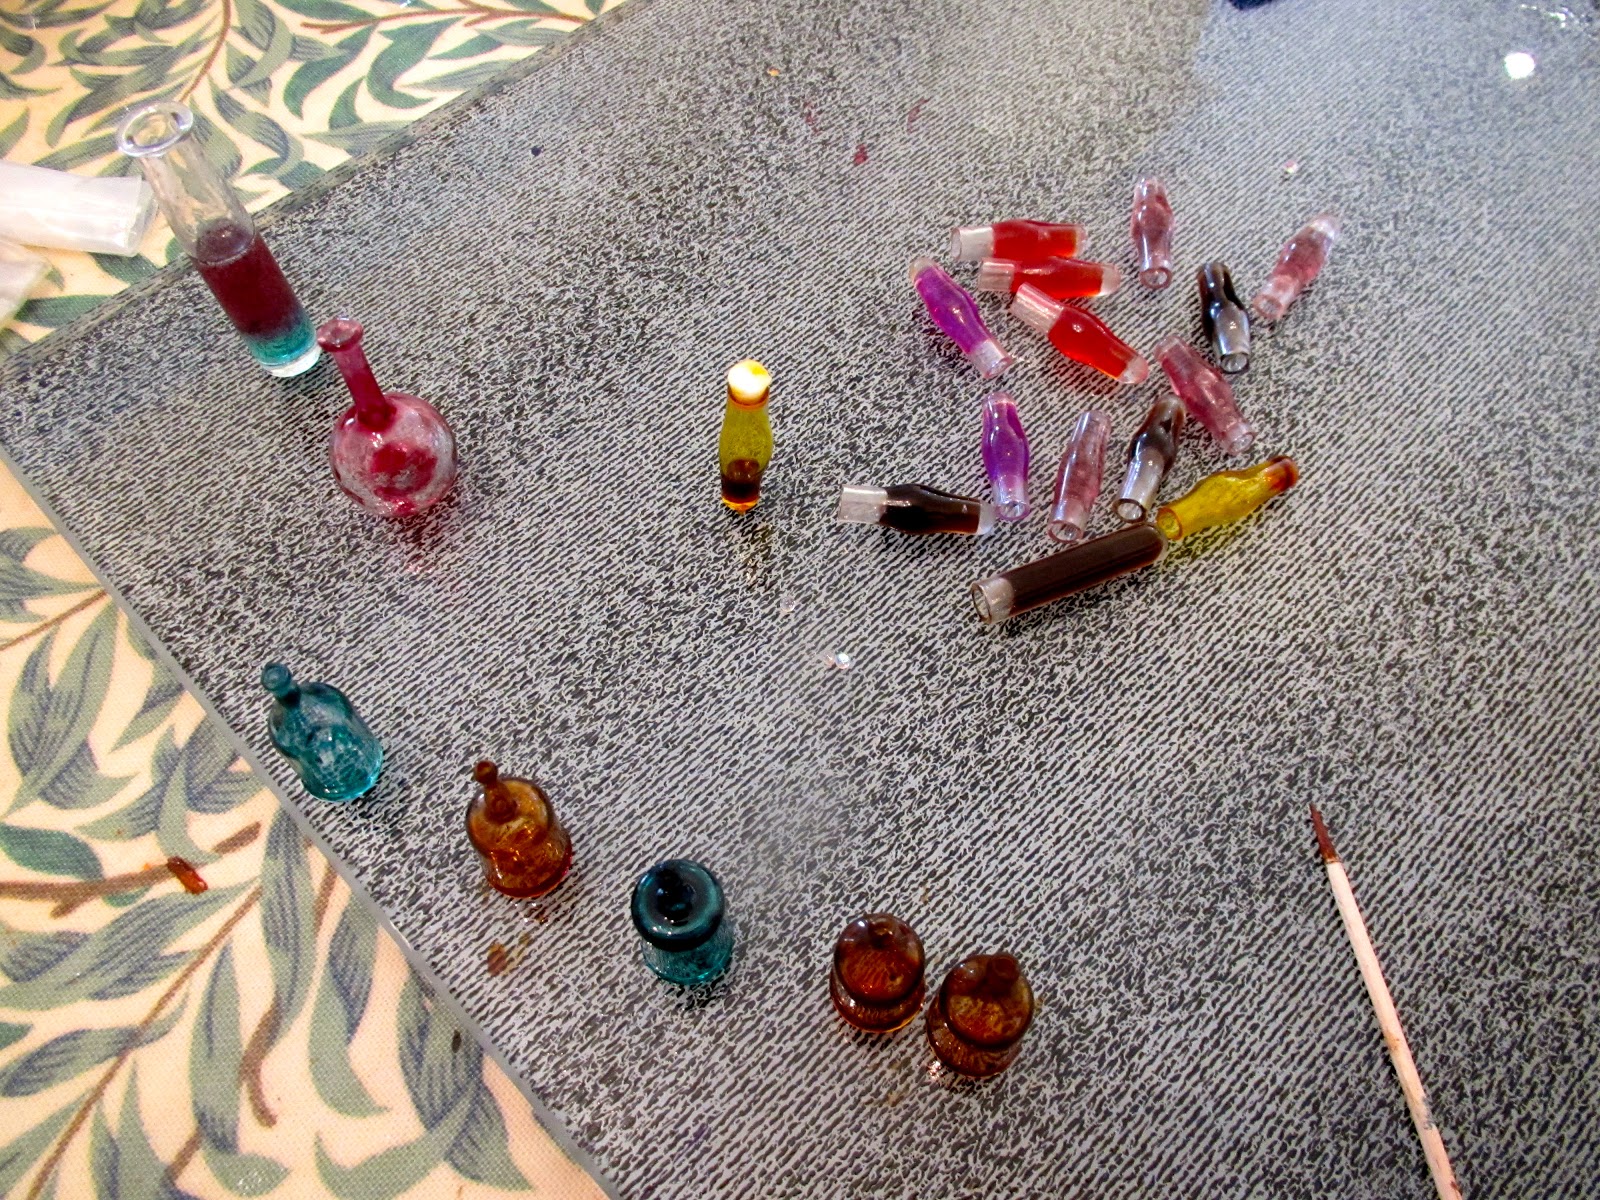
 As my witches are more than a little tipsy they have spilt quite a few of their drinks. For these spills I decided to use Scenic Water from DeLuxe Materials. This is a very easy product as you simply, and carefully, heat the amount you need in the microwave. I used a little plastic tub with a jelly cube amount at a time, about the size of my thumb, in the microwave for 15 to 20 seconds but do be careful it gets very hot!!!!
Scenic Water can be coloured with water based paints, the specialist colours sold by Deluxe or even food colourings ( although I have read that these can fade ). Add tiny amounts until you get the colour you want. Scenic water sets quite quickly but it can be re-melted in the micro wave for a couple of seconds to make it runny again.
I simply spilt it on the table a bit at a time and then helped the drips stay in place using cocktail sticks. Scenic Water does not harden in the same way as Solid Water which is why food miniaturists use it for jellies but because it sets quite quickly it is good for spills.
Gosh I haven't got very far tonight but I am so pleased with this room I want to take my time sharing it.
One room down, nine more to go!!!


Monday, 11 February 2013

I Have Taken To The Bottle........At The Leaky Cauldron

After my little journey into all things shabby and chic I have returned to the cluttered and grungy world of Diagon Alley. The bar of The Leaky Cauldron needs all its bottles and crates filled and sorted ready to open its doors.
I have taken over the dining room table as my work room seems to be overflowing at the moment with all the pieces waiting to either go in the Cauldron or be finished off.
Here are a few of the necessary supplies for this messy and tricky operation: tacky wax for holding the bottles in place when filling, cocktail sticks for slow dripping, fine tipped syringes, a large glass tile for a work mat ( very easy to clean ), glass and creamic paints for tinting, and lots of tiny botttles and phials.
 These are a few that I have filled with Solid Water by Deluxe Materials. This is a resin product that you mix together to make a clear solution. The solution can be coloured with very small amounts of glass paint, oil paint and I even used tiny amounts of ceramic paint. It cannot be mixed with any water based paints. This product hardens off completely as long as you follow the mixing instructions. The more colour you add the darker the mixture. 
 I have been collecting bottles and decanters in all different shapes and sizes for a long time now intending to fill them with all different coloured wizarding liquids. I have now discovered that filling teeny, tiny bottles is not easy and in some cases totally impossible as the necks are just too thin. If I couldn't fill them, even with drips off a cocktail stick, I decided to simply paint them with glass paints. 
 I have filled the bar shelves with a mixture of shapes and sizes. Some of the bottles are the cheap acrylic types you can buy anywhere that I have simply re-labelled and dirtied up a little. 
 Some I have purchased at fairs and soaked off the labels and then added my own, Shepherd Miniatures have a really good glass range in a variety of shapes and colours.
I also printed off any witchy label I could find and stuck them to the back of the shelves and along the side to exaggerate the sense of clutter.
This was stage one of getting the bar together and today I had a full dress rehearsal......
I have lots of photos of all the different nooks and crannies to post tomorrow.


Wednesday, 26 October 2011

Lighting Up The Cauldron Shop........Another New Challenge

While I am in total agreement that all the best dolls houses should have lighting I have always found installing it an absolute disaster. 
A little while ago I made the decision to only install LED lights in all my future projects. With this in mind I ordered everything I should need from my favourite supplier, Small World Products
 For the first time I am having a mix of LED lights and more traditional bulbs because I am going to attempt to light up all the fireplaces. This also meant I needed to obtain the materials for making the leads longer on all bulbs as they are sooo short.
This another of my big moans about lights. Why do they always come with such short wires?!
Well this is the main kit: a transformer (starting top left, down and across), a 3LED light strip, a dual unit connector (more on that later), a flicker unit (for both lights and fire places), extension wire, shrink tube and single LED lights. 
 I have also bought a heat gun that is used for paint stripping for the shrink wrap.
 Wire strippers to expose the ends for connecting each length of wire.
 Lots of red and amber lights for the fireplaces
Phew, seems like an awful lot of stuff for one small shop!! I have already installed the longer LED strips on the ceilings of the shop too.
The LED light strips do come with much longer wires than normal lights so I won't have to mess about with them thank goodness.
 The first thing I had to do was strip the wires on the red bulb. It has the normal two wires and I have to say this is the hardest job of all. No matter how careful I am my wire gets shorter and shorter as I accidentally cut straight through the blooming wire! Patience and a very gentle hand are needed here. 
The extension wire has to be carefully spilt down the middle and then pulled apart to make two wires to match the bulb wire. 
This has to be done at both ends of the extension wire for finally fitting to the power unit/flicker unit.
 You should end up with something like this at each end. 
You need to have quite a bit of metal wire showing to make the next stage easier.
Next step is to cut a small length of shrink wrap tube, slide in over one of the wires and then join each piece. You have to wind the ends together quite tightly as you want to make sure you have a good connection.
The shrink wrap tube then slides over the join.
Last but not least comes the heat gun. A little blow over the wires shrinks the tubing and forms a very firm join........
I have never attempted soldering so I have no idea if this is an easier technique or not but it seems pretty pain free if fiddly. I will try and do a whole buch in one sitting I think as the wire stripping gets much easier with practice.
Now all I need to do is test the bulb.
More on that tomorrow

Tuesday, 17 May 2011

A Day of Freedom!........The Kensington Dolls House Festival 2011

I took a whole day off from the puppy on Friday to attend the Kensington Dolls House Festival. This is my favourite show as it doesn't take me too long to travel there and the range of exhibitors is amazing. There are always a lot of artisans from Europe at this show and I really enjoy looking at the different types of styles.
Two artisans that I do not remember seeing before were Gerd Felka from Germany who had the most beautiful collection of glass pieces, including some miniature bottles in very interesting shapes; and Elizabeth Causeret. I am not sure why I have not noticed Elizabeth's work before as it is absolutely perfect for the mini projects I have been working on for the last two years!
 I had already been more than a little naughty by the time I got to Elizabeth's display so I only bought these three pieces but I could have bought a whole lot more!
 The cask and drip cup were perfect for the bar of The Leaky Cauldron. The cup is so fine and delicate, amazing work.
The pitcher too looks perfect on my new pub table by Michael Mortimer. Unfortunately Elizabeth does not seem to have a website so you can't see the huge range of perfectly formed stoneware she produces but a lot of her pieces are sold by Swan House Miniatures in the US, the prices here are an awful lot more than I paid though. 
I now have a collection of miniature artisans whose stands I visit as soon as I arrive at either Kensington or Miniatura.
There are two main reasons why I highlight where these stands are on my map: firstly, they are always very popular and can sell out of certain pieces very quickly, secondly, I know I will want to buy particular items from them and have learnt that cash can disappear very quickly from my hot little hands at these fairs. So I now make sure I visit my favourites first.
 Michael Mortimer is always highlighted for me now as he produces such beautifully made oak pieces.
 This pub table and chairs were just what I wanted for the front area of The Leaky Cauldron.
Again they are perfectly scaled and will soon be full of wizard good cheer!
Another artist whose work I cannot resist is that of Sarah Hendry of Pocket People. She makes both cats and dogs all of which are then hand painted in the most amazing detail.
 This time I decided on a tabby cat and playful kitten.
Light was pretty poor today but I hope you can see the detail in the coats and expressions of these cats. I have been slowly building a collection of Sarah's cats for a while now and never tire of looking at them. For me she is the best miniature cat artisan I have come across because I like the sculpted look rather than the furry kind. 
Sarah does not have a website but will always email pictures of the cats she has available and send by post.
As I have not made anything for a while now due to the new arrival, I did feel a little stir-crazy at the fair, which means I have lots of things to show......but at the moment I will finish with yet another photo of Lily.
Tomorrow I will come clean about my addiction to the characters of Jain Squires but shhhhhhh, please don't tell my husband!

Tuesday, 5 April 2011

Aging the Leaded Windows.......Using the Liver of Sulphur Gel

Having decided to try out the lead roll method for my windows I then researched the Internet looking for methods to distress the shiny appearance.
I found lots of very different advice and methods, some of which needed a chemistry degree and an industrial laboratory in your garage to complete! While others seemed more than a little dangerous!
Anyway, eventually I found this product,
......Liver of Sulphur XL Gel. This product is used in jewellery making and is perfectly safe for home and hobby use.
 I read the very simple instructions on the bottle and began experimenting on various strips of the lead. Some I sanded and some I left exactly as they come.
The small grided piece is for the door and you can see the gel painted on.
You can dilute the gel or use it straight from the bottle. I decided to paint it on straight from the bottle as I thought it would go on easier and not run too much. In fact it did go on very easily but I then go a little confused. I left the gel on and watched, and watched.......
In my mind I thought I would see an immediate reaction and would have to wipe it off pretty quickly to avoid the lead darkening too quickly. Well as far as I could tell not a thing was happening.
So I decided to wipe this layer off and start again. Then there was a reaction! Phew!! My workroom smelt like a school corridor on the last day of term.....remember stink bombs? Awful, awful smell everywhere. They should warn you about this on the bottle. Yuk!
 But.....the lead started oxidising little by little and after about 2 hours the results looked like this. 
When the colour reaches your preferred shade you paint or rub on a corn starch or bi-carbonate of soda mixture, to stop the oxidisation.
Even with all the rubbing and wiping down the glue backing of the lead has held up well and the window seems fine and ready to install.
Here are some of my practice strips. The top one is the lead as it comes off the roll, it looks a bit bronzed  but the colours are black and grey.
The second strip has been painted with black acrylic paint and then sanded.
The third strip has been sanded and then had the gel treatment.
I can see this product coming in very handy of all sorts of metals if you don't mind the smell!
They also recommend using gloves but as usual I ignore all such advice as I never intend touching the stuff. I was fine as I used a brush and baby wipes so I didn't get any on my skin. You can dunk whole items in the diluted form so I expect you should definitely wear gloves for that.
Tomorrow I am going to buy some nose clips and then I will be ready to finish the rest of the windows!!


Thursday, 31 March 2011

Leaky Cauldron......The Bar Counter, Again!!

As I made such a mess up trying to edge the bar I had to buy another rail and start again. Of course I could not find the same one quickly and locally, so I bought TWO lengths just in case.
 I finally managed to edge the counter, mitres are definitely not my strong point, and painted it a glossy dark brown. 
 I have topped the counter with 'slate' tiles. These have been cut out of normal DIY floor tiles that I had left over from a previous project. 
 I am much happier with this finish.
The main problem is the height. It is slightly lower and sits below the shelving that was sized for the other bar counter. I will have to see what it looks like with the rest of the furniture and my good time witches. 
I have also given a home to a very street wise ginger moggie.
 I hope he has come on his own and not brought unwelcome house guests!!
 This disreputable character was made by the very talented Sally of Miss Sally World and I think he is just right for Diagon Alley.
I have been grunging the Leaky Cauldron today....hmmmm, I think I might have been a little it too enthusiastic with the grunge. Will show tomorrow and see what you think. 

Wednesday, 30 March 2011

I Am Sure There Is A Better Way!.......

I decided that the standar shop door that came with my Sid Cooke house was definitely not right for the 'Tudor' look of The Leaky Cauldron. I remembered reading on a blog that sometimes we can use what we already have as a base and work with it.
So I sanded down the original door and covered both side with strips of balsa. Trimmed and distressed with my trusty tapestry needle.
One of the reasons I kept the door was to be able to have the central window looking into the bar. I am hoping that the surround will hole the leaded window in place.
 As I have still to begin the windows I only finished off the interior side. After a lot of tweaking and sanding the door fitted snugly into the doorway.
 Flushed with success I stained and sanded the door again. I even remembered to test the length of the door to make sure it would still open across the interior slate flagstones.
The finished door has a much better look but it is slightly thicker than the original which did cause problems with the hinges which I haven't quite sorted out yet because the tiny flat head screws have disappeared! For a temporary solution I have used some others but they will have to be changed......when I find the others!
Karin has given me some very good advice about using balsa for tricky shapes and sanding so I will be slightly less amateur in my next attempt at door bashing! Thanks Karin.
In the post today I received a parcel of goodies from the talented and generous Glenda of undancey minis who is streamlining her collection.
 Glenda decided to sell her vampire collection with some wonderful pieces by artists like Ericka and Nikki so I had to have them for my Apothecary shop.
 Glenda also popped in some extra goodies that she knows I will definitely be able to use including a couple of her rugs and gorgeous little baskets. My real favourite though was the tiny, and I mean tiny, delicate pouch/purse which is just perfect for one of my witch's shopping baskets.
 Thank you so much Glenda for my fabulous parcel which I know you have taken the time to send during the very stressful days New Zealand and all its families are experiencing at the moment.