Tuesday, 26 January 2016

Back in the Woods Today.....A Quick Blossom Shrub and Preparing the Ground Cover....

When I was making trees I also made a few wire shrubs thinking I would add leaves and blossom and create height and foliage in the borders. By the end of my tree making period I decided that these smaller wire structures would require more time and leaves than I was prepared to give. 
 I didn't want to waste them, however, so I came up with a quick fix by smothering them in PVA,
 then sprinkling the branches liberally with railway scenic scatter.
 The branches then had 1/4 scale lasered dandelion blossoms added. Not the most natural of looking shrubs, I think I did this at the end of a long day, but the general technique works. Next time I would give the gluing of the blossoms a but more attention.
 At the back of my border it filled a gap quite nicely and added light to a dark corner.
I have spent most of today getting all the stems ready for the ground cover plants I will need for my Caterpillar's mound and the edging of the final two sides.
I thought I would show how differently the same punch shape can look. This is a simple flower punch, on the left hand side I have made a hole in the centre and pushed the flower up to the top of the wire. The flower on the right hand side has had each petal gently cupped and then turned over and slid up the wire. I have topped the wire with a dab of PVA and then orange paint to both stop the flower head from slipping off and to add a centre to the flower.
This shape is from a mini punch as these will be used for ground cover.
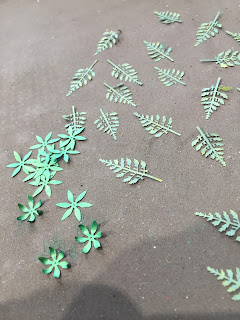
 Just like all of these!! My laser sheets arrived from Mary Kinloch today so I have painted the quarter scale flowers and leaves the set them on wires.
The flowers do have central holes and I have threaded some of them but the really teeny ones I found easier just to glue on the top of the wire. I am not making them into the proper plants so this way was fine for me. 
I have used 30 gauge wrapped florist wire but I might be tempted to use a 32 gauge when I have a go at making the actual flowers in the future.
I have also bought some tiny leaves to experiment with too which might prove a challenge! 

Monday, 25 January 2016

And Now For Something Completely Different......

Like many a crafter, collector and miniaturist I am always thinking of the next project, the next fun thing to create or the next beautiful piece to buy.
After all the flowers are done and planted I intend to have a mini project break and these are my new treasures I want to showcase.
 Domes of all shapes and sizes seem to be a bit of a decorating rage at the moment and I picked up a large dome in the Marks and Spencer sale a few months ago. When I saw Jo Medvenic's new Downton Abbey dowager I knew I had a prime piece for my dome.
Unfortunately, this dome did not have a base and after much thought I decided to use a cake board as the circular base. I intend to cover the silver paper with oak floorboards and look for a circular rug when I attend this year's shows. 
It seemed meant to be when I saw the silver silken dowager on Julie Cambell's magnificent stand at the Christmas Kensington Fair and I brought her home with me to meet her new friend.
These wonderful ladies will make a great display in my living room so the colours are perfect to fit in with my current colour scheme but now I need to decide what to do with the furniture pieces.
I have an unfinished Bespaq sofa, side table and plant stand purchased from Maritza Moran's Etsy shop as well as a chair that I hope will suit my Alice. Maritza is a very talented artisan who produces hand painted pieces of the highest quality for the most luxurious dolls house collectors, do take a look at her personal website, her work is amazing.
Now I don't aspire to such perfection for my dowagers but I do want to upholster and paint these pieces but have never attempted something like this before. 
I need to remove the current padding and with other pieces of furniture I have microwaved them to soften up the glue. I am assuming that this will still be the right thing to do with a piece of Bespaq.
I have Googled 'painting Bespaq' but so far not had any joy.
Essentially this is just bare wood so I am heading towards staining and varnish.
These pieces have quite a lot of fine detail so I am a bit worried about losing the detail by adding too much paint or varnish which is why I am going the stain route.
I am still awaiting my laser sheets from the US so I can't finish off my final blossom trees and bushes but I have finished all the plants now so it won't be long before I can play with my new toys!!


Friday, 22 January 2016

Seem to be Stuck Down the Rabbit Hole....China for the Tea Party

I have been thinking about the china pieces I need for my Mad Hatter's Tea Party.
There will be ten settings which means ten of everything, plus at least six teapots, plus sugar bowls and milk jugs. 
I have googled and googled in an attempt to find the right china remembering that my scene is very closely adapted from the original look.
Now if the unredeemed Lottery Ticket belonged to me I would not hesitate in commissioning everything by the Japanese artist Miyuki Nagashima. I haven't been able to find a website for her but there are lots of examples of her work if you google her name and pick images.
I have seen her pieces at the Kensington Dolls House Festival on a number of occasions and it is simply gorgeous.


There is also the wonderful work of Teresa Welsh of The China Closet.
Teresa sells on Ebay I have recently discovered and I have long admired her beautifully hand painted pieces. I am not sure if she accepts commissions but I don't think my budget will stretch as far unfortunately.

Then there is Stokseyware, whose work I love. It is very delicate and beautifully scaled but can I really justify £23 for just one cup and saucer when I need ten? Of course if this was my one project I would not hesitate but I have lots of projects. 


I have searched for a miniature china maker whose pieces are more in my price range but have failed miserably. I am now thinking that my only route is Reutter. Not as beautiful as Stokeseyware obviously, and certainly not as delicate, but in a price range that I can justify. Remembering that the plates are for show, it will be the cakes and characters that will be stealing the scene.
There are quite a few designs by Reutter : Yellow French Rose,


Gold Crosshatch,
Blue Onion....


....are I think my favourites and seem to be pretty easy to get in the UK although they are also available in the US.
I think the Reutter yellow set is the front runner at the moment.
I might just have to bite the bullet and buy one set just to see the quality and scale. 

Amazingly I am off to Chicago in April to visit the miniature shows that are held there. Persuaded the husband that we just had to visit Chicago before flying on to Calafornia! So my plan is to wait until I go to these shows before making a decision on the china.

Any thoughts or favourite china maker links most gratefully recieved.


Thursday, 21 January 2016

Moving Round the Corner.....Still Planting.

I have managed to fill in three more sections of the woodland over the last couple of days.
These flowers are all from the same kits I have already used. I do have kits by a couple of other makers but I want to keep them for more specimen plants for my other mini projects. They are all a bit more complicated and I need ease and speed at the moment.
As I started packing away this evening I had a good look at what plants I have remaining......Not good news. I am definitely going to have to make some more. I still have two sides to complete and I appear to have too many left of the same type which will lead to a lot of repetition. 
I also think I might have over planted these areas.......
Looking at them in the photographs they all look a little too packed in.
 Oh well nothing to be done about that now.
So, tomorrow I will be returning to the kits I have left in my very depleted stash.
Which is ok as I am waiting for some laser sheets of the tiny blossoms to arrive from the US.
Onwards and upwards!!

Tuesday, 19 January 2016

If You Go Down to the Woods Today.......

I will still be planting.......
I began yesterday by picking a selection of flower stems. I use a dry oasis from Hobbycraft to hold flower stems as I work. A large block is £1 and I cut it in half, they do shed oasis dust but hold the stems in place very nicely.
 Having decided what flowers I am going to group together in this portion I go back to each kit packet and work on the leaves. This usually includes a but of extra colouring and cupping or curling. I had expected that this stage would be completed in no time at all but as usual I completely underestimated how long it would take. The most important thing is to make sure the plants had different heights and depth of foliage.
 Getting height from the flowers led me to make my own foxglove/gladioli thingies which have actually turned out much better than I expected but were incredibly time consuming.
I started with what were supposed to represent unopened flowers at the top and then added rows of punched flowers glued into the same cupped circles and then finished with cupped geranium leaves that I had previously punched. I have used the same process for all the tall flowers.
They make not be real plants but this is Wonderland so I think I can get away with a bit of artistic licence!!
Many of the kits I use start with the creation of a 'bud' at the top of the flower stem as can be seen here with the pink carnations. I think this is a way of hiding the wire stem and it prevents the additional petals from sliding off. The trouble is that you seem to end up with a big clump at the top with some of the plants and no matter how I tweak and crimp I can't seem to bring the other petals up to meet it. 
I also noticed that even using this technique I never seemed to be able to completely hide the tip of the wire so I now dip all the wire tips in a matching paint colour which avoids this problem.
I lost the kit leaves for the carnations so I added some leaves from my tree stash. These are obviously not accurate but they add a bit more greenery than the proper leaves. 
I made a little blossom bush to hide the LED strip light in the corner next the The Caterpillar using the tiny quarter scale flowers from Mary Kinolch and it seems to have done the job.
 Once I had added all the leaves I added a layer of air drying clay and began placing out the flower stems checking heights and depth. When I was happy with my choices I removed all the flowers and added in the tea leaf/PVA mix. Once this 'soil' was in place I replanted all the flowers including a small patch of tiny pink begonias around the tree trunk.
 On finishing the planting I realised I did not have any teeny tiny ground cover plants to fill in the front gaps beneath the medium sized plants. To avoid the super tidy flower bed look I need to make sure that the edges are broken up by spreading plants and these need to be tiny like the begonias.
 This led to a bit of a mad rush using Mary's laser sheets yet again. These sheets are such good value providing many pre-cut flower shapes and I quickly prepared the wire, added the flower heads from the quarter scale sheets and finished off with some leaves. I had to hurry because the 'soil' mix hardens off pretty quickly and I didn't want it to set and not be able to sink the wires.
In this section I have used: Pink Begonias by Bonnie Lavish, then from the back, my own yellow tall flowers, orange lilies, white roses, blue hydrangeas, pink fuchsias and pink carnations all by Bonnie Lavish. The 'lavender' plants have been made from FlowerSoft and punched leaves.
Another section down and my flower stash is still looking quite healthy but next time I will make sure I have enough teeny plants ready for ground cover! 


Sunday, 17 January 2016

Beginning the Flower Planting in the Wood.....

I have begun the planting in the back flower border using kits by Bonnie Lavish and Templewood Miniatures. Most kits of this kind seem to be around £5 each and will make anything from six to eighteen individual flower stems.  
I have discovered only this evening that Bonnie Lavish kits are once again being sold via her own website and she also has an FB page, Bonnie Lavish Miniatures, which is great news for all fans of her very accessible kits.
Templewood Miniatures are based in the UK and have their own range of kits that I have used for the first time in this project. The kits have a very similar technique to the Lavish kits but vary in an interesting way. The leaves are copies of actual leaves so they require no painting or embellishing at all, which is pretty cool. The Templewood kits also provide great value for money as they contain a lot of single flower stems.
 Both kits come with full instructions and all the paper and wire parts required to make them up. 
I have learnt that there are some basic steps that you cannot ignore when putting together these kits. Number one: when it says wipe glue through the cut, wrapped wire, make sure you do it. Kits that require you to slide on flowers and leaves, need glued wire ends otherwise they will unwrap with handling, something that will annoy you no end!
Number Two: all the kits will benefit from cupping and curling but you must treat the laser sheets with care otherwise you will end up with a lot of split or crushed pieces which are a nightmare to glue onto your wires.
Number Three: make a few kits before getting creative, knowing how to put the kits together easily allows you to work out how each one might be improved upon next time.
I play with the basic kits a lot by painting or shading, or cupping the petals the opposite way directed, or adding different leaves. In reality the kits can provide a great base for you to play with your own ideas.
Number Four: if you are going to paint the leaves or flowers invest in some wax paper as you need to lift the sheets without the problem of them sticking. Wax paper is the best resource I have found to prevent either paint or glue sticking and I would seriously recommend everyone to add it to their craft stash, it is invaluable. After painting you must hang they sheet to dry off, do not let it dry flat, even on the wax paper. You can dab off excess colour onto the wax paper before hanging up to dry.
I have used lots of different means to colour but my main choices would be watercolor and pastel pencils for most detail work. Watered down acrylics are pefect for washes. Again be careful when washing laser sheets as you don't want your leaves/flowers sticking or creasing. Dab off any excess paint if need be and straighten the shapes when wet.
 I am going to work on a small portion at a time with a bottom layer of air drying clay to further fix in place any nearby tree. I have then chosen a group of plants and tried to vary both colour and height. The leaves are curled and added to the flower stems and the wires cut to the length required. 
From the back: the white stems are made up with a wire dipped in green model railway scenics and then topped with some of the quarter scale dandelion flowers by Mary Kinloch. The orange flowers are made from a Bonnie Lavish marigold kit, as are the purple dahlias and pink tulips. The white flowers are white anemones by Templewood Miniatures - these are a great buy as each kit makes about 15 stems! 
Once I had my group of stems ready I have topped the clay with a tea leaf/PVA mix which allowed me to 'plant' each stem in the 'soil'. You have to move quickly and carefully as the tea leaf mixture will harden off. Good tweezers are definitely a necessity!
 Then I moved on to a slightly bigger section which need much taller plants both to hide the LED strip and fill the vertical gap between trees.
Here we have sunflowers, marigolds and roses by Bonnie Lavish. Holly bush by me: it is a wired structure with mini punched holly leaves and caviar bead berries. The tall lilac plants are also made by me. One of the benefits of working with kits is that you get ideas of how plants might be put together using whatever punches you might have at home and how they might work. These lilac plants are a cross between a delphinium and foxglove just using a small leaf and flower punch. Oh and lots of glue and patience!! 
The yellow spiked flowers are also made by me. The wires have been dipped in yellow scenic scatter and then I have added some punched leaves from all my previous tree experimentation.
Two very small portions finished so far. I am just beginning to realise how important all the weeks of preparation have been.
I will leave you with my last bit of advice. Once you feel confident with the kits start playing with them and have fun. Use colour, curling, tweaking and any other technique you fancy. Then move onto creating your own plants however you want with paper, beads, scatters and fluff.
It is fun!!


Saturday, 16 January 2016

It's Been a While But I Have Been Busy in the Woods.....

It might be cold and frosty here in England but I have been busy, busy making the plants for my Mad Hatter's Tea Party Project. 
So many kits and punches later I have at last reached the point when I believe I have made enough flowers to fill the flower beds that will make up the background for the scene beginning at the back with the Caterpillar's mound.
I decided to use LED strip lights to illuminate the flower beds. I was a little indecisive about adding light to this project but decided it will provide more interest in the evening if it was lit in some way.  The mound is made from foil and masking tape, Jain Squires Caterpillar has wedged in nicely.
 The three beds now need to be filled with all the trees I have made. I and the gaps around the mound filled.
 I have used a basic air drying clay to fix the trees in place. I know this will dry out and is not a permanent fix for the trees but the clay will be covered in 'soil' that I hope will glue them in and add stability. I had read that Fimo is a better base as it stays more flexible but when I tried to use it I realised that I would have to spend a lot of time warming it up and I was too impatient to start. 
 As the clay takes a while to dry out I do have the chance to move things around as I plant, even once dried the trees and bushes can be moved as the clay has not stuck to the floor of the room box.
 I have also added blossom to some of the trees and roses to one of the larger bushes. Finding small enough punches has been a real challenge so eventually I bought some of Mary Kinloch's laser sheets. The quarter scale sheets are perfect for tiny flower blossoms. I bought the dandelion, mum and daisy sheets which are all on Japanese Crepe Paper. They colour up beautifully and are very versatile. Mary is available on FB for UK buyers and is very helpful if you want to order some of her laser sheets. Just send her a message on FB detailing the sheets you would like to order. Mine arrived in next to no time. I have already ordered some more today for creating tiny border plants.
 The clematis flowers and roses have both been made using Bonnie Lavish kits. I have quite a stash of these kits which are no longer available in the UK but I was lucky enough to see some on Ebay a while ago that I snapped up immediately. I also bought some from a US seller but I can't remember the site off hand. Flower kits are a great way to make plants but they do vary in difficulty, I like these kits because they are simple and straight forward.
 This little blossom tree is one of the wire structures I made. I have coated it with a railway scenic scatter, couldn't face the idea of tiny leaves, and then added some of the quarter scale dandelion flowers.
 This blossom tree shows the difference in size when using a mini punch. I have just about got away with it because it is a much bigger tree but I wish I had gone for the smaller laser blossoms earlier.
I am always amazed how my projects seem to eat up resources. I felt like I had made more than enough trees and bushes, I was expecting to find I had a few left, but I seem to have made just enough. Phew!! In fact I have had to use a couple of twig trees that were part of my stash but they seem to have blended in ok. 
I have filled in the gaps around the mound and then covered the back gaps with dried out and ground tea leaves mixed with a basic PVA glue. This has then been topped with clumps of railway scenic moss. I will have to add some more greenery to hide the LED strip, maybe a small fern.
The tea leaves will dry and harden which might make adding greenery to this corner a bit more problematic. Hmmmm, will have another look at this tomorrow.
Generally a good start to the planting, my only worry now is the amount of flowers I have made.
 I have five of these oasis block ready and waiting.
 Leaves to be added as I plant.
Surely this will be more that enough!!
Fingers crossed.