A few people have been asking where I began when making the sweets for Honeydukes, what you need and how to do it so I thought I would do a couple of posts on really basic hints and tips.
Please remember I am not by any standards an expert on clay or sweet making, I am a home hobbyist who likes to collect so I am sure there are lots of people who know much better ways of doing things but if any of you find these posts helpful I will be glad I helped.
First things first are the items I could not have done without.
A basic pasta machine that clamps to your work surface is invaluable for conditioning your clay/Fimo and for giving you nice flat pieces to play with. You must work your Fimo before you start playing with it otherwise it breaks up and splits. I always warm mine up in my bra for about an hour before starting too, this makes it much easier to roll initially.
Very basic tool kit for me. A small plastic cake roller, it's quite heavy and solid, cheaper than the proper Fimo one but works just as well. A long blade and a simple razor blade with safety cover. A set of tiny plungers in four shapes by
Kemper. A large glass cutting board of the type you can buy in most homewares shops. These are perfect for working with Fimo.
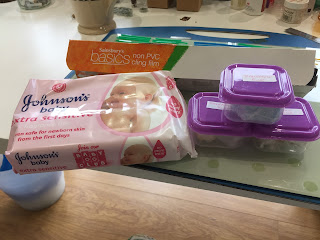
Baby wipes of any kind are essential for keeping your board and hands clean. Cling film, of the non PVC type, for wrapping up left over clay and I also have these tiny boxes that I label to put wrapped leftovers in. I got them at Poundland in a packet of eight I think. I also have two glass place mats for baking the clay in the oven.
If you are thinking of doing a sweet shop you will need to buy a lot of Fimo/Premo/Sculpey because you need a variety of colours and types but stick to one brand if you can as you don't seem to be able to mix them. They all behave quite differently and as a beginner I found it much easier to get used to using one type. I bought Fimo as it was readily available in my area but be prepared to spend at least thirty pounds on clay from the start. I bought a variety of Soft and Translucent colours, you need both types for sweets as they give completely different effects.
In this Sweets 101 post I will only be using the Translucent Fimo colours as I want to make Rock Candy for my counter but everything I do today can be done with Fimo Soft normal colours.
Firstly, I flatten out the Fimo and pass it through the pasta machine.
Take it out, fold it and keep passing it through reducing the thickness of the pasta/Fimo as you work it.
After a couple of minutes you will end up with a flattened piece ready to use. As I want rock candy I have a piece that is the thickest on my machine but I expect all machines are different and eventually you will work out what is best for you. It has taken a while for me to used to what is best for what I am doing but every mistake I have made has mainly been due to not thinking small enough. Sweets are tiny.
The most basic of sweets can be made like this, simply cut thin strips and place them on a baking sheet.
You will end up with long rectangular canes.
Back the clay goes in the machine and I produce another flat piece but half the thickness. I then slice off a very thin strip.
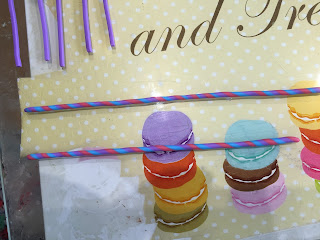
These strips are then twirled by hand, really easy, and you can see how different slice thicknesses create different sized twirls. These canes are perfect for candysticks or liquorice wands.
First tray for the oven. I also rolled out a very simple cane to make circular sweets.
A very simple spiral cane will produce colourful sweets in a variety of colours. I have rolled out three quite thin strips of Fimo.
Push the three strips together very gently at one end and then twirl the three strands around each other. Try to keep the thickness of the cane consistent all the way to the bottom. If you notice it is thicker in places simply give that section an extra soft twirl.
From the three strips I have ended up with two multi-coloured canes ready for baking.
These canes have been produced in exactly the same way.
Instead of leaving them knobbly I have rolled them out into circular multi-coloured canes.
Baking Fimo can sometimes cause a surprise. I always put it in my little craft oven at 110 degrees for 20 minutes but here you can see that the yellow canes have all baked quite differently into a variety of shades. I have no idea why but it doesn't make any difference to what I am making.
Three different ways of using these simple canes. On the left the larger round cane has been sliced into sweets. In the middle the much thinner canes have been sliced into tiny circles and more chunky sweets. The twirly canes show the translucent Fimo quite well, it gives a finish more like boiled/hard candy.
I have cut up the colours and bagged them. Hopefully you can see the look you can get just by changing the diameter of a strip.
The rectangular larger strips I have chopped roughly to produce little piles of rock candy for my counter.
The multi coloured canes are also sliced ready for bagging.
These twirly canes are destined to be sugar straws.
As I had the clay out I made a few lemon sweets as I have a feeling I don't have enough sherbert lemons to fill the tray. These will be dusted with fake sugar and hopefully even fool Dumbledor!!
All these methods are a great way to practice as you can get a whole variety of sweets quite quickly.
If you are only looking to add a few sweets to your project there are some great mini confectioners out there. Here are a few of my favourites.
My Tiny World - they sell great chocolate canes and a fabulous range of hand blown jars.
Well, it didn't rain so a few chores were done but the work shop is just too inviting at the moment!


