Monday, 16 July 2012

Making Miniature Books Part 3

I have been spending time trying to produce books that look like aged, distressed or interesting leather.
These are the ones I have made by layering wrinkled tissue on a piece of card, cutting the card to size and then folding over a piece of balsa.
 This method has led to mixed results. The balsa has had lines drawn at the edges and then stained with gold paint or wood stain. The books' covers from the cut card have a very clean edge, whereas the book at the top of this group has had the tissue folded over to soften the edges of the book.
 The clean edge is not a problem for the books that are going to be shelf fillers and they are much quicker to make but for the book piles I will need to make more of the wrapped edge books. 
I had already cut some book covers to size so I added the tissue paper for folding over.
I could have dumped these covers but I liked the green finish of this card. 
 These two books have had their charms and texture highlighted using Rub 'n' Buff. Again the wrapped edges are a much better finish.
 The spines of the two books show the difference of simply folding and scoring the card stock.
The book on the left has a much rounder spine and is less defined. 
Either look works for my needs I think.
I am really pleased with how these have turned out but if you want the look without the pain please have a look at the books of the extremely talented Victoria in her Dark Squirrel Etsy shop. She has some marvellous books available at the moment. 
More supplies!! I found these on Ebay from diamantecrafts, they sell a whole range of really tiny gem stones both 1mm and 2mm. They are made for nail art but would have lots of uses in our mini world.
 A quick and simple way of decorating the spines to start with.
 Plus a little bit of steampunk for the shelves.
 Much more traditional spines and labels. The font is size 4, really tiny.
The whole group together, or one shelf!! Oh my word, have a long way to go!! 
During a very wet Sunday I have pasted some normal sheets of paper with the crinkled tissue to see how that turns out. Practice makes perfect!!


Wednesday, 11 July 2012

Making Miniature Books Part 2....Inspirational Collection

I am lucky enough to have been able to collect a number of miniature books made by the most talented of artisans. These have provided me with lots of inspiration now I am filling the shelves of Flourish & Blotts.
This is an open vampire book by the talented Erika Van Horn.....
 ..... and of course I couldn't resist this open wand for Ollivander's.
This is a leather covered book that has been aged beautifully with all the natural textures enhanced.
This book is destined for the Magical Menagerie's Dragon Room. 
 All of Erika's books have aged parchment pages even this secret potion book's pages are completely separate! Erika's work is highly sought after so it is well worth joining her mailing list to see all her new items for sale. She also has an Etsy shop Ev Miniatures and a blog where Erika has also shown some of her own lovely collection, check it out here Erika's Blog 
These teeny tiny paperbacks are handmade by Treefeathers and the printing is so clear it really puts my own efforts to shame. 
I have recently discovered the truly gorgeous miniature books of Pat Carlson whose packaging is collectable in itself. Each tiny, beautiful book has its own hand styled and painted match box cover.
Pat's books are fully functioning and open to reveal readable pages and illustrations.
Pat is currently taking a break from miniature making as she is having knee replacement surgery but hopes to be back in August. Pat also sells her work on Etsy so be sure to add her shop to your favourites.
These aged a distressed favourites are by a young artisan L.Delaney whose Etsy shop is full of wonderful books and other eclectic and unusual items.
 You will have to excuse this awful photograph that does not do justice to these beautifully crafted books by Lee Ann Borgia. They are all readable and Lee Ann does a full wizard range as well as many other vintage titles. 
Lee Ann also has a shop on Ebay and usually offers free shipping.
 This collection of Gilderoy's books were purchased from a US site Fingertip Fantasies. They have a huge range of complete sets of books.
 Lastly, but most certainly not least, my first toppling book stack by Karin Casper who makes the most delightful miniatures and cottages.
 I couldn't resist trying it out for size in the window, I think it looks perfect as a statement piece.
Karin sometimes has work for sale in her Etsy shop.
If I win the lottery anytime soon I will fill the shelves of Flourish & Blotts with the work of all these talented artisans. Until then it's back to the drawing/cutting board for me!!
I would also like to thank everyone who has left a helpful hint or tip on my previous posts. Thank you all so much for taking the time to offer some of your expertise and information.


Friday, 6 July 2012

Flourish and Blotts Wood Finishes.....Another layer of Varnish

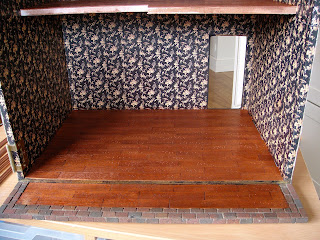
I have laid all the floorboards in the bookshop and have begun colouring the boards. These are mahogany pre-cut strips with three layers of stain so far.
 The balcony floor looks much more permanent now the flooring is down too. 
I have also stained the skirting boards ready for when the bookcases can be fitted into place.
 Many layers of mahogany stain and varnish later I have finally finished all the bookcases. Phew! It did take some time but I am happy with the overall colour now. It is slightly darker than shown in this picture.
 The opening front panel will also be lined with bookcases and I have glued all these in place. I now need to decide what I am going to do with the windows. The top windows will have a book stack all along the outside edges so I am not sure if I should add architrave or not. 
Hmmmmm......also should the architrave be in mahogany or black and gold crackle to match the windows??!!
Decisions. Decisions.
Oh well I will have plenty of time to think about it while I am making books!!

Thursday, 5 July 2012

Making Miniature Books Part 1

I am up and about at last so I have set up my dining table for miniature book making. 
Thanks to everyone who gave me links or advice about where to look for tutorials, I have looked through lots of them and have started with two methods that have come from blog reading and looking carefully at some of the beautiful books I already have in my collection.
The first method I have been working on is the creation of fake leather/dragon skin. This is what I have come up with from various sources.
I have torn strips of tissue paper very roughly.......
 ...... and then glued the strips in over laying each other. I used a PVA/water solution and just slapped it on in layers on a piece of card stock. I started with two sheets one I simply tore the tissue paper into strips and for the other sheet I crumpled the tissue paper and then tore it into strips for a more crumpled effect.
 I let these sheets dry thoroughly and then coated with a layer of acrylic paint and two coats of a PVA wash which gave the textured paper a really nice gloss.
I will cut these sheets up into book covers tomorrow.
 I also decided to see if I was better of using this method on pre-cut book covers as well as trying to see if I could texture the front covers with hidden charms and glue blobs.
Here you can see the different stages. As I have a lot of bookcases to fill a lot of the books will have wood centres.
On these covers I have layered the tissue over an owl charm and a spider charm. Can you also see the glue bobs on the spine? Definitely trying everything here!! Added one coat of acrylic paint.
 Not sure how well this is working over the charms. You can just about see the spider underneath.
 Using my finger I have lastly, worked in a coat of Rub n Buff which really seems to have brought the texturing alive. I will now be able to trim them down and add the pages for the inside.
 By the time I trim it, fill with parchment pages and perhaps a spine label I think it might make a good topper for a pile of books.
The second method I have started with is much simpler but surprisingly time consuming.
I have printed off lots of complete book covers/jackets from Google images. Deciding that my Flourish and Blotts will include on its shelves lots of books that I have enjoyed with my children as well as those with a fantasy link.
 I tried printing directly onto card stock which worked quite well and meant I could then glue directly onto the balsa 'pages' insert.
I also printed onto paper which I then glued onto card stock, allowed to dry and then put together.
They both seem to work out the same really.
I also cut up some wall paper and leather off cuts. The leather was a nightmare to cut. I used a craft knife, scissors and a Stanley knife but still ended up with very rough edges. 
I have made the books in blocks of 3 and 5 as I think grouping the books will look much better on so much shelving.
The one thing this last couple of days has taught me is not to be too obsessive about all these books. I am going to concentrate on setting out lots of statement stacks and individual books around the whole shop.
Maybe one day it will be filled with individual, opening books that can all be read!! Not this year though!!