Wednesday, 21 October 2015

Getting Going With the Mad Hatter's Room Box......

If there is one thing I have learnt when starting a project it would be that forward planning is essential, even with what appears to be a straight forward room box. I want to make sure that I have a clear idea as to what will be required to enhance and disguise before I start all the interior pretty bits. 
The floating lawn area has required an additional strip of wood to be cut and this needs to be in front of the front perspex sheet. 
It seems ridiculous to actually mention such an obvious adjustment but there have been many occasions when I have gone along merrily and realised too late that pieces have been glued down in totally the wrong place or I have had to add bits at the last moment because I didn't take the time to think things through.
 I have also cut all the mouldings for both sides, the front and the top even though I will not be gluing down any of the front and top pieces until the whole project is finished. This enables me to paint everything at the same time and I won't run out of the particular shade of grey I have opted for and all the wood with receive the same treatment at the same time.
 I used a basic mitre box and hand saw for the mouldings and was pretty pleased with the results. 
 The top of the box has a large perspex sheet which will be edged by a cornice moulding but the front edge sat too low to add any support to what will be a long piece of cornice and a join. This has meant my adding a long strip to the edge of the perspex to support the cornice and front moulding.
 While waiting for coats of pain to dry I started to play with the interior walls. Although there will be three flower beds I needed to add a background for the planting. I am not very confident with a paint brush so started with a very basic blue sky and green bushes.
I then started toning down the sky by adding dollops of white paint to my basic blue a bit at a time and just layering on different shades of paler blue.
I repeated the same process with the green bushes but in a slightly more dramatic style.
Four differing shades of green and my background is ready for the planting to begin.
I am going to have a try at making some tree trunks out of Fimo and air drying clay for a more woodland feel and give the idea of height. The actual scene is eleven and a half inches high, so eleven and a half feet in twelfth scale, so I can get away with some tall trunks suggesting much taller trees surrounding the Tea Party. 
I need to do a bit of research on how to do it but as the will be flat backed I am hoping to do all the work on my glass tiles which will make the sculpting slightly easier........famous last words I know!!
So lots of moulding to paint but moving along nicely at the moment.
Rainy days are great for getting stuck in to a new project!

Monday, 19 October 2015

Here We Go! New Project Down the Rabbit Hole.......

When I first started this wonderful hobby I spent a lot of time in Blogland reading and learning from the many artisans and home miniaturists that posted about their wonderful creations. One day I came across a truly inspirational setting by the miniaturist Susan Wener of the Mad Hatter's Tea Party. 
I decided that one day I would attempt my own tea party and for a number of years I have been collecting the relevant characters by Jain Squires both from fairs and with a little help from my friends.
Well at last the time has come......
 It will be a room box scene to go in my newly vacated bedroom, my youngest son has recently left home, that I have been de-cluttering and re-dressing for the last couple of weeks. Big clearing out and lots of bags to the local charity shop!! 
I like the projects I have in the house to match the room they will be placed in so the exterior of this room box will be soft greys and creamy chalk paints with an Alice quote or two, maybe.....
 This is quite a large room box, as usual my plans seem to grow and grow, that I had made by a very helpful man at Dolls House Concepts. I sent my measurements to Ted and he made exactly the size I asked for at a very reasonable price. The really cool thing about their range of room/display boxes is the fact that they have a perspex ceiling which means that the project can be seen from above as well as from the front. The perspex roof will also allow for much more light to enter the box, especially at the back. 
The back and side edges will hold all the flowers and bushes that I intend to make myself from the huge number of kits I seem to have collected. I love the planning stage and spend a lot of time thinking things through to try and avoid problems as the work progresses. In order to create the flowerbeds I will need a good layer of 'soil' because the stems will need to be planted so I have drawn a shape for a floating floor/lawn. 
 All projects start with an undercoat for me. This seems to give a good base surface and prevents warping. I have also primed all the wooden trims and mouldings I will also be adding to the exterior.
 I use a very cheap all purpose paint from B&Q so it can be used over and over again.
The floating lawn has been built with a variety of wood off cuts and then primed. Once I have finished messing about with the exterior walls I will cover this with a grass sheet purchased from a model railway supplier. 
Having raised the floor level I have had to add an extra piece of wood to the front to hide the gap. 
Now I need to plan the mouldings for the case of the room box and then start mitring, definitely not one of my favourite jobs especially where cornices are involved.

Tuesday, 22 September 2015

Honeydukes Welcomes Its First Customers..............

Little bit of a delay in throwing open the doors as real scale life got in the way yesterday but as you can see three little witches by Silke Janas-Schlosser have had lots of fun.
 Inside the shop floor is looking pretty busy too.
 There is even a 'hostess with the mostest' displaying a tray of goodies. This candy witch is by Jain Squires and the Malfoy Family Hogwarts 1st year is by Julie Campbell.
 The counter looks pretty crowded and one little wizard definitely has his hands full.
 I am lucky enough to have a lot of mini dolls so I have been able to fill the shop up quite nicely. One of the good things about Harry Potter inspired scenes is that you don't have to worry about time periods or what clothes your characters should wear as the costumes are so varied.
 These dolls are b Jo Medvenic, Debie Lyons and Jain Squires.
These two 1950's boys and little witch are by Julie Campbell. The little girls are by Jo Medvenics.
So the shop is sort of full. As time goes by I will probably fill the shop with more 1940/1950's dolls to give the shop more of a retro feel but this will be achieved over many years. For now the whole project has come to an end and I can at last move on.
What's next? Here's a clue.
I am off to the Rugby World Cup tomorrow at the Olympic Stadium which should be fun , so no minis for me for a couple of days which is a little annoying as I am keen to get going. 
I am hoping this one won't take quite so long!!

Sunday, 20 September 2015

Mrs Flume is busy........Honeydukes Awaits Its First Customers.

Be prepared for a photo overload in this post. I just couldn't stop myself today as Honeydukes was moved from the work station and onto the finished position. Plus I can't stop say "finished"!!
This is my Honeydukes exterior. It is quite a large shop so it will be staying in the workshop with my other Hogsmeade projects. The whole design is inspired by the Honeydukes in Universal Studios both outside and in.  
 Mine is smaller and doesn't have snow also I have chosen to have the pink windows seen from other aspects of the shop as I wanted it to be a bit more cheery and a little less weathered to match the pristine interior.
I have kept the exterior simple mainly because of the dust that generates in my workshop so the side wall has three stacks waiting for delivery and a broom rack for customers to leave their modes of transport. 
I bought the crates off Ebay and added the lids and labels. I probably could have made them from scratch but I have been racing to the finish line and knew they would take me a while to put together. 
 I have just stained them with two coats of light oak wood stain and then waxed.
The larger Weasley box I made up myself and added Googled images. A quick and cheap fix that I don't have to worry about getting dusty or fading.
 The broom stand is made up from scrap wood and dowels cut from a kebab stick. Hark at me getting all technical.....dowels! Ha, ha!! The broomsticks have been in my Harry Potter collection for years and are by Nikki Rowe, Kat the Hat Lady and various others. I have added a few bows and charms to some of them. I was going to put up signs and may still do.........one day!
The guttering is a kit from Sussex Crafts that I have painted and fitted together. Of course where there are witches and wizards there must be a cat so here is Mrs Flume's ginger tom by Miss Sally's World.
This is the interior as a whole. I have made the majority of the sweets, lollipops and canes with the addition of Fimo canes and Nikki Rowe plus a few bits and bobs picked up over the last couple of years. Mrs Flume is busy checking her stock, a wonderful commissioned character by the talented Jo of Pocket Pygmies.
After re-positioning the shop I was very relieved to discover the lights by Small World Products were still working! The Bats' Blood Soup display is ready for lollipops to be dipped into. I made up this box for the dipping cauldron and went for pink to match the staircase but I am still not sure if it should be green......The side of the shelves have been infested with sugared candy mice from Matlock Miniatures. They have been painted and covered with sugar/glitter.
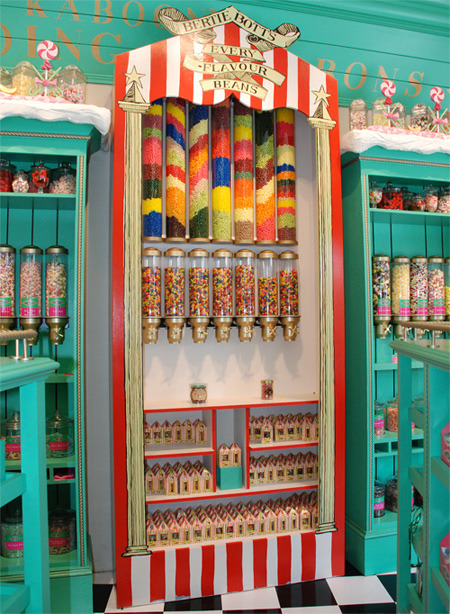
Here you can see the Bertie Botts display on the back wall where it sits very proudly. The false boxes have worked out perfectly.
This is a large cauldron by Sussex crafts that I filled with Fimo scraps and then stuck in some longer lollies and canes then baked. I then poured in liquid Fimo that I had coloured with oil paint. I think I added a bit too much paint so it is a little darker than I really wanted. The canes have also gone a bit limp during the additional bakings but hey ho! The bubbles have been formed by pouring and dribbling the liquid Fimo over the translucent glass beads I bought from OOAK Artist Emporium. I have used the smallest sized bead here.
In order to get an over flowing cauldron I poured and teased the liquid Fimo over the lip of the cauldron and let it flow as much as I could. This was all done on a glass tile that I could put straight in the oven to bake.  I baked the cauldron and all the contents for about the 4th time and the flowing liquid Fimo hardened to create the dripping over flow I was after.  
The cauldron display was then finished off with a selection of lollipops. Hmmmm, still not sure about the pink.
The counter, made as a commission by Rob Lucas of World of My Own Miniatures, has been filled with a whole range of goodies including the scales which are a kit by Phoenix Models. There is also a perfectly formed pink cup of cream topped coffee by Paris Miniatures, who have just released their new Pink Collection, do have a look in their shop the range gorgeous. 
The toffee apples are by Nikki Rowe and the ice creams are by Erika Van Horne. There are also some candied skulls, Ton-Tongue Toffee and various Honeydukes sweeties. The glass stands are from a new glass supplier I recently discovered on Etsy called Global Miniatures. They stock a whole variety of dolls house supplies but I have only ordered glass pieces so far. I have been really impressed with the quality and variety on offer.
 The second counter top has a Honeydukes chocolate display, another gorgeous cake stand and my own effort mad up from jewellery findings and spray painted.
The bottom of the spiral staircase has been lined with cans and candy canes. Just because I felt there were not enough sweets in the shop!!
 To finish a last look at Mrs Flume and the Fizzing Wizzbees I have added as a last Harry Potter touch. 
Phew, this has been a long and slightly self indulgent post but I will sign off now by saying.....once again.....Honeydukes is finished and opens for business tomorrow!!
Can't help smiling when I write the most wonderful of 'F' words!!
Have a great evening.


Saturday, 19 September 2015

Last Job Done....Bertie Botts Display and Honeydukes is Finished!!

I have had a little blog break for a number of reasons: there are only so many posts you can do on the real donkey work of sweet making and displays, summer gardening and the return of my youngest from places far away in time for the departure of my daughter for a place even further away. I have had time to achieve what I had long despaired would ever happen........I have finished Honeydukes!!
The last job was completed today, the Bertie Botts Every Flavour Beans display.
 I started with a standard white wood bookcase, removed one shelf (after softening the glue) and painted it white. 
 Using Word table function I created the red and white striped tent to cover the bookcase.
 For the bean dispensers I have used plastic test tubes bought from Ebay and cut to size. Each end sealed with jewellery findings from Etsy.
 The bottom of each tube obviously needs a dispensing funnel of some sort and I have used bead caps and spacers collected from various fairs and shows.
 The test tubes have been filled with 2mm beads, I hate that you can see the holes but this display will sit on the back wall so I can live with it.
 I cut the striped tent to size, my second attempt, and strengthened it by sticking it to card. The columns are ones I found on Google search and the lettering has been taken from the original boxes of beans. I was a little concerned that the test tubes wouldn't stick well enough so I left them over night to dry completely.
 On returning to the work shop this morning I was very happy not to find a couple of hundred beads on the floor!!
I tried out various ideas for handles and eventually settled on the one on the left.
 One of the reasons I have been dreading making this display were the number of boxes of beans I needed to fill the bottom shelves. The cutting and shaping of twenty tiny boxes filled me with dread. Then, while walking the dogs, I had a 'Eureka' moment. These two shelves will be at the back of the shop and not hugely visible so a cheat is perfectly acceptable.
I cut two pieces of scrap wood and stuck them to the shelves.
 I then cut off all the tabs and bottoms from the box templates I had already printed out and filled in the windows with fake beans. I scored the boxes as if they were indeed being stuck together and then glued the fakes onto the wood strips.
Ta Dah!! Not a bad effort if I do say so myself. At the next fair I attend I will look for some shallow glass bowls to put under the dispensers but all in all it's done. 
This is the one in the Universal shop.
Of course mine is a lot less complicated but I think it will do the job nicely.
More to come tomorrow with the grand opening of my Honeydukes sweetshop.