Showing posts with label Sid Cooke. Show all posts

Friday, 8 June 2012

Flourish & Blotts is Showing Off!!

Gosh how time flies when the weather is awful and your three children return from a year at Uni! How do you get all the washing dry when it won't stop raining!!??
Well I have finally got out of the utility room, one end of my lounge looks like a car boot sale and the ironing board has been banished for the weekend.....so here are some pictures of what I have managed to fit in over the last few weeks.
 Lots of brickwork beginning with the front panel and the paving paviors from Richard Stacey
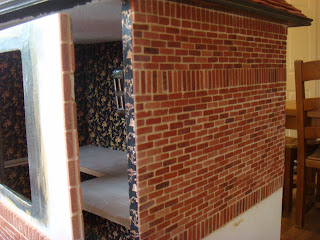
 Both side walls follow the same pattern and all the bricks have been sealed and grouted. This was a very long job but quite calming once you get into the swing of it.
 The roof is quite large on this shop and I wanted to avoid using ridge tiles along the roof joins as I didn't like the look of these joins on my previous corner kits. At the edge I  have sanded down the roof tiles.
Once I had finished the roof tiling on both sides, front and back I laid a line of over lapping roof tiles down each edge after sanding them flat.
I am really happy with this tile frill as it looks a lot neater than the traditional ridge tiles.
The top line of the roof still needed the finishing touch of traditional ridge tiles though so I wandered the streets of my village peering closely at various Georgian houses, with the dog so I would not be mistaken for a peeping Tom!!
This was very instructional as I discovered that the tiles were stuck on with mortar and this allowed them to sit proudly. 
 I built up a ridge of grout along the top and then squidged the ridge tiles in place. This worked really well once I had also added some PVA to the grout to make sure the tiles stayed in place.
This is a large roof space and tiling was very time consuming!!
 Although the roof tiles are a variety of colours I decided to try my hand a more paint effects after my roof research. This is the first layer of grime and I have gradually built up darker layers.
 This Sid Cooke kit comes with two lower round bay windows but I wanted top bays as well. Sid Cooke are now selling extra parts for their kits which meant I could add the extra bays with a bit of tweaking.
 The fit of the top bays is by no means perfect as the window openings are the wrong size but I am doing my best to hide this with paint and mouldings.
 Flourish and Blotts' exterior with the vast majority of the grunt work completed. Windows in, brickwork distressed and ArtMache render drying off nicely.
 This time I went back to the tried and trusted method of marking where all the mouldings would be glued and then laying on the ArtMache. I have not glued in the window panes yet as I want to be able to dress the windows from all angles.......eventually!!
 The brickwork and roof do look a lot more aged in real life but they still need a couple more coats of grime I think. The 'bashed' top bays were a little fiddly to install but a lot of PVA plus the render appear to have fixed them in place quite solidly.
 Once the render is completely dry I will be able to start the griming and ageing. These layers will really bring the whole shop together.
 The 'bashed' top bays were too wide for the pre-cut openings so I have painted and crackled a strip along the side to imitate the black/gold interior and wood work. This blends in surprisingly well although the interior will need a bit more work.
Lastly I have made this little oblong balsa box for the back door of the shop which will be a false hallway complete with book piles and bustling customer I hope.
I have commissioned the made to measure bookcases and they are due to arrive on Tuesday which is very exciting but also completely terrifying. I prepared all the measurements and plans so if they don't fit it will be a very expensive mistake. They are the biggest commission I have ever made so I am keeping everything crossed at the moment!!
The sun is supposed to shine tomorrow, oh wouldn't that be nice!!
Have a great weekend everyone.

Tuesday, 28 February 2012

The Magical Menagerie Has Walls and A Roof......Next Shop Unveiled!

The exterior of The Magical Menagerie is almost complete. I have spent nearly a week Art Macheing all the walls. It was a long, long job.
 Two reasons it took forever. Firstly, I like a smooth finish, so I have to make sure the surface is laid at more or less the same depth and it then has to be smoothed down with my fingers and various flat tools.
 Secondly, I decided to glue on most of the moulding before applying the ArtMache for the first time with this kit. Usually I mark out where all the moulding goes and then apply the Mache. Why I decided to change I do not know.......It was a BIG mistake!!! I had to be so careful which slowed the whole process down dramatically. Plus it was much harder to do. Plus no matter how careful I was mache still went where it should not!!
 I haven't put the windows in yet because I want to match them with the interior woodwork and I decided not to work on that part of the project at the moment. Once I start looking at the interior rooms I know I will get distracted by the fireplace, or the doors, or the cages..........
I am keeping to the master plan.
 I have had a lot of trouble getting this kit to fit properly and you can see here the gap here. No amount of sanding or tweaking has helped but the double quoin strip has helped disguise the flaw.
I have decided to move on and put up with it.
 I am trying to make all the roofs look different from each other so I have tried to slip these tiles a little as if the roof is suffering from dis-repair or low flying dragons!!
 These are Richard Stacey weathered tiles and are very varied which was perfect for my roof. At the moment they look a little to bright so they will be dirtied up when I age the whole exterior
 I will add lots of dirty paint to all the exterior walls to match it with the look of the other shops in the Alley.
 A peek through the top window into the dragon room.
The street paviors are also down and ready to be aged. I will leave the front door panel all in brick but I have still some moulding to add. The two strips meant for this panel have disappeared, have absolutely no idea where they are so I am in the middle of painting two more. Gremlins on the loose again!!!
 As one exterior comes to an end another one starts. I have put together the carcass of 'Flourish & Blotts'.  This a Sid Cooke County kit that I was lucky enough to win on Ebay for half the list price. It was untouched and still in all its original packaging. 
So here I am back to moulding painting!!
This will be my last shop for quite a while as I want to work on the interiors of the five I have started. There is all the lighting to be done and all the exteriors still need finishing off as well.
Plus I need to start emptying all the boxes of furniture and props I have lying around before my workroom explodes!!

Monday, 20 February 2012

A Magical Disaster! When a new products works too darned well

It's been one of those weeks when nothing seems to go as planned. Not anything major thank goodness just time consuming and more than a little irritating! My lovely Lily went in to be be spayed which is a very standard operation these days but a puppy who doesn't feel well is much the same as a baby - or a man - who doesn't feel well. Very time consuming and surrounded by guilt when you just want to scream!
Anyway as we have been confined to barracks I have managed to get in some mini time all be it with a puppy on my lap.
 I decided to try out a new product on the wooden mouldings after not having much success with the crackle products on the market. After four under layers I painted on the new product and then covered with the final top coat of black.
 The effect was dramatic and almost immediate. In fact it was too good and too dramatic, no subtle crackle here.
Then as I looked closer I realised that the paint had been stripped right back to the bare wood. Straight through my four layers of cream and olive/gold.
I was not a happy bunny I can tell you. 
 This is what I used and it definitely works. It will be perfect for weathered floorboards and lots of other applications but not for my moulding. So I rubbed them down and more or less started again. Grrrrrr!
 I have also laid the flagstones down in the ground floor room of the Menagerie. These are from Richard Stacey and although they lay beautifully they were quite difficult to cut with my meagre tool collection.
 Now they need to be sealed, grouted and distressed.
 My dragon room on the upper floor is going to be quite stately in  a singed and sooty kind of way. So I have laid beautiful mahogany floorboards from Miniature Wood Supplies.
 I have drilled lots of worm holes and then used a walnut stain so they are not too red in colour. Then I 'varnished' them with a brown glass paint to bring out a gorgeous shine. 
 Eventually the mouldings have been finished and they are now mostly glued into place ready for all the ArtMache to be applied to the walls.
 The quoins supplied with the kit were only supposed to fit down one side but when I attached to door I discovered I just could not get it to line up properly. No amount of sanding or tweaking would get the door and signs to align. More grrrrr!!!
Luckily I had extra quoin strips from a previous kit so I have covered the gaps with the extra strips. 
This kit seems to have required a lot more sanding and tweaking than usual. Sid Cooke kits are very snug, they require a lot of preparation before decorating and if you don't do things in the right order, or remember how painting the front door will effect its fit, they can prove very irritating.
Once I had put on all the mouldings bar one or two strips, I started looking at its shape and tried to work out how it would fit on the end of my Diagon Alley.
I then realised I had bricked the wrong side wall! The side I had bricked was in fact the back. More grrrrr!! So I had to get out the brick slips again.
It has always been part of my very long term planning to 'beautify' the backs of my shops, eventually! This will be my test case, all sides will be finished off. Apart from all the lighting wires of course, I will just have to remember which is the back!!

Wednesday, 1 February 2012

New Year......New Project......The Magical Menagerie

The Magical Menagerie is my new project for 2012 and will be the fourth shop for my Diagon Alley.
I am going to build this corner shop from Sid Cooke to compliment The Leaky Cauldron corner kit. 
Eventually they will sit at either end of the alley.
 I am a very impatient builder usually and then I end up with all sorts of problems when I decorate. My New Year's Resolution was to read the plans and follow instructions!!
 This time I read through all the instructions and matched up all the pieces to work out what bits I would be painting before sticking on to the kit.
I also spent much more time than usual sanding down rough edges especially around the windows.
These kits are very tight fitting and they become even more tight once decorated......
 .........so I even sanded down the door, the sliding panel and the bottom edge of the front panel.
I am learning at last!
I also prime the whole kit. I will be using quite a lot of Art Mache on the exterior and I have found that using a good primer prevents warping and also gives a good base for adding acrylic paints.
It's amazing how time consuming this part of the process is but it does give you time to get used to all the pieces and plan what and where.
I also put shops 1,2 and 3 together just to get and idea of the final look.
 The Leaky Cauldron, The Cauldron Shop and Mr Mulpepper's Apothecary. Of course none of them are finished but the main work has been completed.
 The Leaky Cauldron represents 'ye olde' diagon Alley with all its weathered beams but the main street will all have a Georgian look with bay windows. The Art Mache rendering is much more weathered than it looks in the photographs but the brickwork still needs more dirtying.
I haven't done any more work on my paperclay roof this will be a continuing job as I work on the Menagerie. 
I still need to work out how I am going to separate the shops to allow the doors to open. I will definitely have a dark alley but I am also thinking of narrow brick walls for posters or a resting pedlar.
Oh and a new house with a 15 foot workshop!!


Friday, 4 November 2011

It's Amazing How Much You Can Do.....

With one hand and all the usual chores out of the question!
A trip to the fracture clinic this morning resulted in a new ''full" cast in a rather chic red! I decided against hot pink, lime green or fluorescent orange.
I even got to see the X-Rays today and the extent of the break. I can understand now why it is still so painful but it is improving every day.
The good thing is I have a lot of free time for playing!!!
 I had already prepared the wood for the mantle/fireplace surround so it was a relatively easy job to put it into place. 
The top may be a little too deep but I wanted a shelf deep enough for cauldrons.
I will see how it all looks once dressed.
 I have also finished the grouting on the paviors for the pavement and steps. You can also see where I have made a boo-boo. The steps are upside down, take note for future kits!! This has left me with a very small lip, too narrow for a step. I am thinking about what to do with it.....
No rush, I will see what it looks like once I have sanded and grimed the pavement.
The quarry tiles have also been grouted and are ready to be dirtied up in line with the shop floor.
 As tiling seems to be something I can do at the moment I have installed the roof. I was going to leave this til last as I wanted to have an internal attic shelf lit and stocked with old stock and bits and pieces.
Putting on the roof will make this a bit more fiddly but it does mean I can move on with the roofing.
With so many fire places I obviously need more than one chimney. There will be three altogether and I am going to try and make them a little quirky.
 Along the edge of the roof I have glued a slim piece of wood (they are actually stirrers from my favourite coffee shop), these will lift the first row of roof tiles to the proper angle.
I have no idea why this works. or why it is necessary, I must have read it somewhere, all I know is it works.
I will also paint these in case they can be seen along the edges.
 So, what to do for the next couple of weeks?
A new project of course!
Here is my next shop, Slug & Jiggers Apothecary, the Sid Cooke Regency Shop Kit all sealed and ready to be transformed.
This accident of mine is proving to be the best way of making me focus on the construction it is too easy for me to become distracted when I discover just the right piece by a fabulous artisan!
Now I need to find the wallpaper I bought at least two Miniaturas ago!!!