Showing posts with label Shadow Box. Show all posts

Monday, 14 March 2011

Harry Potter Birthday Disaster...er I Mean Project, Part 3

The paperclay proved to be a disaster. Well that's not quite true. I finished the painting and the clay did not crack any further but the backboard of the shadow box warped horribly and despite many an hour under heavy weights I could not get it back into shape.
This meant it would not fit on to the back of the frame. Which meant I had to start again.
So new frame. Smaller than the last.
Same left over roof tile flooring with a little bit of greenery to hide the gap at the back.
This time I lined the frame directly with bog standard stone effect paper nothing fancy.
A bit of bush greenery in each corner softened the edges nicely. All was going well until I noticed the size of the back board. For reasons known only to the manufacturer the board was the same size as the glass, this meant it fell straight into the frame. I could not work out how the board would ever fit. Surely it needed to be slightly wider than the opening?
Well anyway, the physics of that was beyond me. I am sure there is a really simple answer but what I did was make four sides to frame the hole at the back and cover them with the stone paper providing an edge all the way round.
The backboard could now be glued to this. 
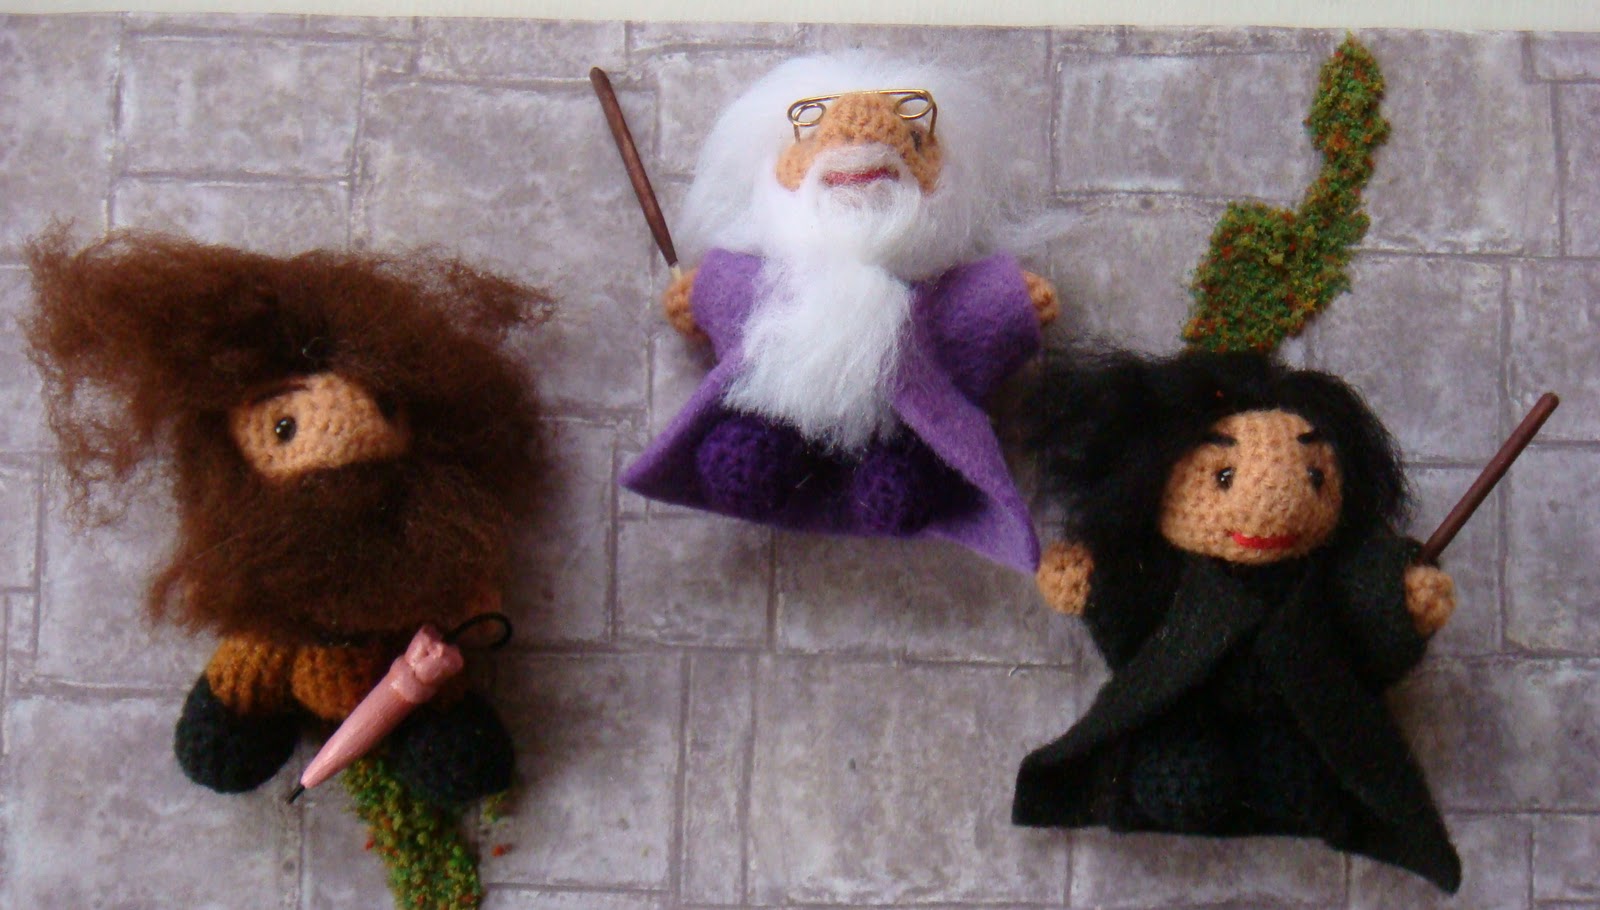
This will be the stone wall for the new floating shelves. With my son's birthday on March 15th I have been a little worried that my teeny Harry Potter dolls would not arrive on time.....but they have!!!
How cute are these?! They will really make him laugh, she says hopefully! Birthdays never seem to be as much fun when you are working and paying rent so I wanted to make him feel that he is still allowed
 to have a bit of silliness in his increasingly sensible life!
Shelves still need to be added and they will each have their name on a parchment scroll.
When everything is glued into place I should be able to place them all in the shadow box. A much simpler project than I had first planned!
Floating distressed steps added along with the parchment name scrolls.
Oh dear! Set light to this scroll but after taking three attempts to get the right font and size I decided to leave it as is. He is deceased after all!
All done just in time for the birthday tomorrow. The back fitted on nicely and I have added picture hooks so it can be hung up, somewhere!

Friday, 4 March 2011

Potter Birthday Project.....Part 2

I have been working on the shadow box for my eldest son's birthday this week with mixed success. This is the first time I have attempted a project like this so I decided to use it as a practice for using paperclay because the area was small enough to hide any boo boos.
 I started with the basic idea of the back wall and four sides. The back wall was to represent a stone wall in Hogwarts with six floating shelves for my mini Potter dolls. I marked out the frame inset on the shadow box back and rolled out the paperclay in batches fitting it into the square.
The clay was very easy to manipulate and joined together well with a little pressing and moulding by hand. You have to use glue to adhere the clay to a clean surface, it will not simply stick on its own. 
To get a brickwork effect I used a very useful tool from Malcolm's Miniatures which gave me the basic structure without too much effort. To give the clay a slightly rougher look I used a stencil brush on each brick, just gently pressing into the clay.
I had already prepared the shelves and cut out a strip of clay and glued them into the clay.
So far so good, now I knew I had to wait for it to dry......
In the meantime I prepared the four walls. Two I covered in wallpaper I had left over from The Leaky cauldron. One I covered with left over ceiling paper and the fourth I painted grey and then used some roofing tiles to create a cobble-stoned effect for the floor.
......and I continued to wait for the clay to dry. I must admit this drying time was a complete surprise, it takes ages!! I knew I had to wait for the clay to dry completely cos everyone states do not attempt anything at all until the clay is dry.
And as it dried, it cracked, lots! 
 The biggest problems occurred where I had placed the shelves. Huge great cracks. The others didn't worry me too much because they would improve the weathered look. I also had to weigh down the edges as the backing began to bow as the clay dried.
All in all it has taken about three days to dry completely.
 I filled in the really bad cracks with ordinary polyfilla, which smoothed out most of the problem but if this had happened on one of my houses I would use a more creative repair method. 
I have painted the grout marks in so far. I have made these quite dark as they may become paler as I add additional colour washes. 
 Here the texture of the brickwork can be seen a little better. including a rather large crack before filling!
I removed a lot of the grey paint with a baby wipe as I went along which somehow transferred itself onto the clay and has accidentally provided me with a very effective start off wash!
All in all its not come out too badly. I now have to fit it all together, finish the colouring of the bricks, add some slime and greenery, make some aged labels, fix any more cracks......