After painting the back walls of the room box I have not been able to resist starting on the interior garden scene. I have used a ready made sheet of railway scenic materials for the 'lawn' on top of the floating shelf. This is quite basic at the moment but I will dress it up as the project progresses.
Making the trees is quite a daunting task so I have collected together a number of tutorials in my Pinterest Alice In Wonderland board that I have read and read.
I have started with a basic shape and armature made from tin foil. I have then covered the tin foil with basic masking tape to hold the shape.
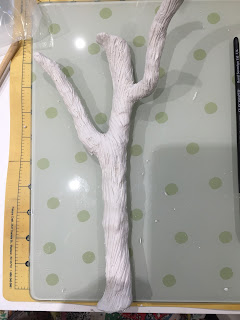
I have covered the wrapped armature in the basic air drying clay you can get from Hobbycraft.
This tree is going to sit in a back corner and will go right to the top go the 'ceiling' and hopefully create a green canopy with the other tall trees.
Using a cocktail stick I have tried to create a bark effect along the trunk and branches. The immediate result was quite effective and I have to keep telling myself that foliage and my caterpillar will be hiding quite a lot of it so leave it alone and move on.
After leaving it to dry overnight I notice a fair amount of cracking this morning. So I have added a thin layer of new clay to hide these cracks but even if there are any more cracks I think the final coats of paint will help to hide damage.
I am going to place my caterpillar under this tree on top of a small mound. I want to give him some height so that he can be seen and not get lost at the back.
This tin foil will form the basic shape.....
........and I have covered it with masking tape for either covering with soil or grass, I haven't made my mind up yet. The tree is a good fit behind so one down and quite a few to go.
Using the wire armature technique this time I measure and wind three long strips to make some plain tree trunks that I hope will give an extra dimension to the feeling of forest height to the room box.
I have used wire from the jewellery supplies section of Hobbycraft but lots of people use stripped electrical wire which may work out cheaper and of course there are a whole range of floristry and sugar craft wires.
This time I have used Creative Paperclay, which is quite a bit more expensive than Hobbycraft's own brand, but I wanted to see what difference it make make to the overall finish.
I also covered the wire in masking tape before adding the clay.
What I haven't done with either methods is use ant PVA glue to help the air drying clay stick to the masked armatures.......Hmmmm, I think I was supposed to but the worst that can happen is that the clay, once it dries, comes away from the frame. As my trees are only going to be seen from the front and side it shouldn't be too much of a disaster.
I have tried to vary their shapes and thicknesses, these will be my largest trunks I think, and again weathered the bark. I will have to give them at least a couple of days to dry completely before painting.
I am planning to give the clay a first layer of Gesso primer before starting with the acrylic paint but if anyone knows a better way of preparing the clay for painting I am definitely all ears.
Looks like rain here again tomorrow which means I should be able to spend another day in the workshop playing with my toys.
Well, what else can a girl do on a rainy day?


Hi Janet. When I did my paperclay trees, I didn't use any white glue on the armature either and I didn't have any problems with it all holding together after it dried.ANy cracks that might appear can be "disguised" as part of the bark :-) Once it is all painted up and dry brushed, it looks very natural.
ReplyDeleteI did not prime with gesso (or anything else) but I did mix the first layer of paint (acrylic) with an equal amount of white glue (PVA). The combo really makes a great bond with the clay and seals it quite well. After that, I just added what layers of paint I thought necessary and finally did a dry brush technique to highlight all the loverly bark roughness. I might have a photo of one of my trees. I'll give a look.
Susan
Thanks Susan. I won't bother with the Gesso then go straight for the PVA/paint mix. I must admit the tutorials made it all seem quite straight forward but I know from experience it takes quite a few goes before you have the 'eureka' moment, so any advice is great.
ReplyDeleteEl árbol tiene muy buen aspecto con sus ramas retorcidas,estoy segura que con las capas de pintura se asemejará a uno real!!!!
ReplyDeleteBesos.
Muchas gracias Pilar.
Delete