Monday, 28 May 2012

Harry Potter Studio Tour....The Costumes, The Potion Room and Dumbledore's Study.

Recently I dragged my husband to the new Harry Potter Studio Tour mostly as a camera back up! He has never read the books and has probably slept through at least half of the films but he likes a day out if lunch is offered!
Due to his lack of Potter pedigree we pre-ordered a digi-guide for him and he found this a great gadget to play with and he could astound me with all sorts of film facts as we wandered round.
Now before I move on with the tour I do have a terrible confession to make.......I have found all of the HP films a huge disappointment. I can't bear Daniel Radcliffe, I think he has been an awful HP and if it wasn't for the tremendous performances of the truly talented adult actors we would have been stuck watching all those terrible child actors.
I did, however, adore some of the sets so this trip was a must for me both for inspiration and building ideas.
The door to the Great Hall is the entrance to the exhibition and hardly a child in sight! If you are thinking of taking younger children be prepared to spend more time in the shop than the main exhibition. This is definitely a look but don't touch tour with a few interactive gadgets along the way.
Well on with the tour......Scattered through the halls are the costumes we all know so well now.
 The Grey Lady in the Great Hall.
 The Slytherin costumes of the later films.......
 ......and Gryffindor of course!
 The staff: Professor Flitwick,
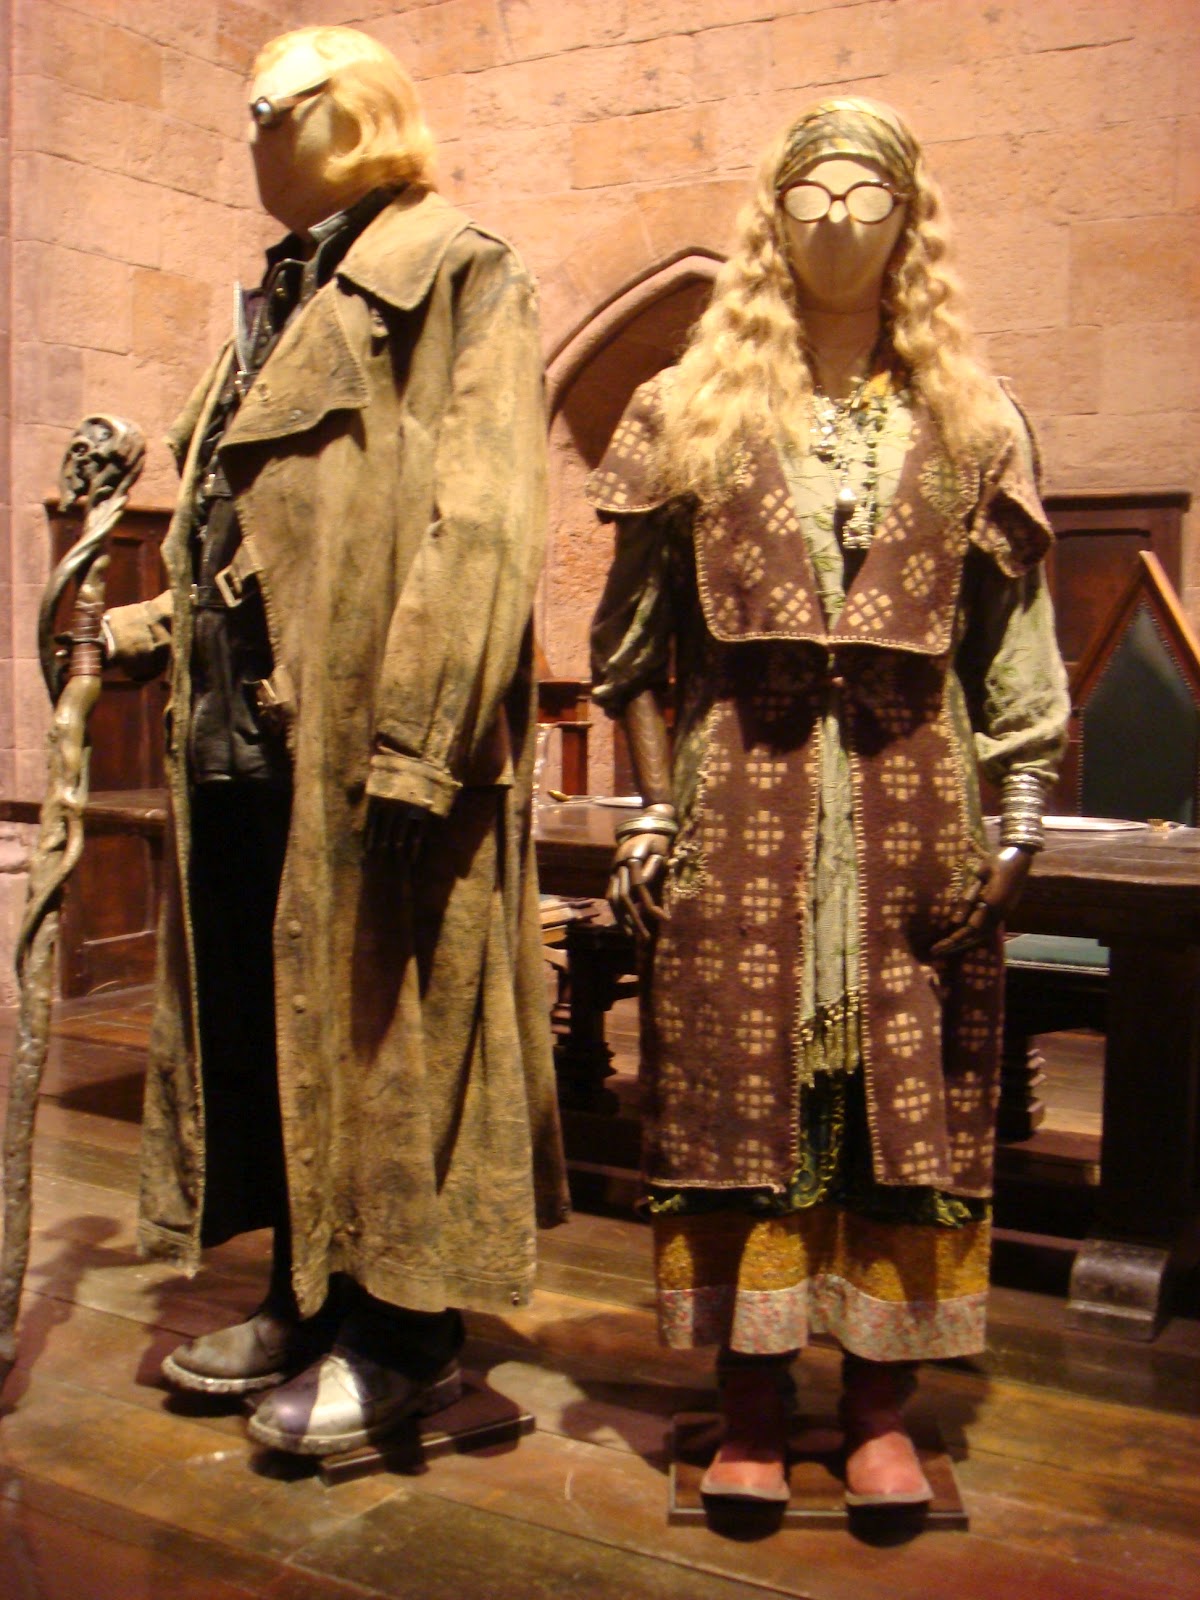
 Mad-Eye Moody and Sybill Trelawney
 and Severes Snape.
 The gorgeous costumes of Beauxbatons School from 'The Goblet of Fire'.
 A collection of Death Eaters......
 .....including 'He who must not be named'.
Pretty in pink for Dolores Umbridge.
A lot of the props and sets are from the later films probably because so much of the earlier stuff has been destroyed or dismantled (or on the walls of lots of lucky crew and cast members!!).
 The set for Dumbledore's Office is really interesting for those of us doing HP scenes or steam punk themes. 
 You can walk around most of the set but this part has a barrier. The blue lighting is due to the changing lighting within the halls for day and evening. This makes it very atmospheric but a pain to take photos!
 One of the many cabinets all full of marvellously interesting brass pieces. A trick I noticed that I will definitely copy, the same pieces are repeated in the different cabinets but set next to different items each time. This makes the cabinets look very individual but easier to fill.
 Lots of ideas to take away here too.
 This was gorgeous. 
 I am sure we could make lots of these items in miniature to liven up our wizarding shelves.
The Potion Room was huge. Maybe even the biggest of the room sets.
 There was everything in this set that you could possibly want to see for any wizardly project inspiration.
 Jars and jars of potions....
 .......and magical mixing equipment.
 What I really found interesting was the use of over-sized jars and bottles. This will be a great way for me to use all the glass ware I have that bought thinking it was miniature!!
 Everything is covered in a fine layer of dust which certainly adds to the dungeon feeling.
A table ready and waiting for a group of students.
I have created a folder of all the photographs I took on the day if you would like to see more of the exhibition. No labels yet but I think they are pretty well known!
Enjoy.

Thursday, 3 May 2012

Magical Menagerie Interior Preparation.....

I am planning to have lots of wall cages in the Menagerie and inspired by the work of Peter Clark I am going to try and build them using crates. 
 I have been playing with various layouts and am not quite sure how I will stack them yet. I need to put in a false door on the back wall but the 19 crates still don't look enough while the side wall looks very bare with the smaller pile.
 I will stain them and then fill them with all sorts of magical animals.......eventually! I am intending to use netting and cocktail sticks as ways to make the animal crates safe for customers. Lots of cats of course but I want it to look very chaotic plus all the pet supplies needed to look after you magical pet!
I am hoping to get a few ideas from my studio tour, if the Menagerie is on show.
 I also added to my cage collection when I visited Miniatura this Spring. This is a lobster cage made by C & D Crafts but it looked so unusual I knew it could find a home in the Menagerie. Do have a look at their website, they make lots of marvellous pieces including a pet carrier that I have shown in a previous blog. They even have an eco-friendly cane coffin!
I started tiling the roof of Flourish and Blotts today and have completed the two small sides. Lots more to apply but with the weather as awful as it is at the moment I am wiling away the time.
Have a dry weekend everyone.


Wednesday, 2 May 2012

Where Has the Time Gone?

Gosh it has been an age since the last time I posted. Sometimes life just whizzes by without you even noticing. My children all returned from Uni for Easter and created the usual happy chaos which always means very little time for my mini world.
I did, however, make these.....
 ......for the little princess in my life who celebrated her 21st birthday at Easter time.
Like all little - and big - girls she was a huge Disney princess fan so it seemed like a fun thing to make her. My first attempt at decoupage which is a lot harder than I thought!
My girl is very hard work when it comes to presents so as she is finishing her third year studying Archaeology and has been accepted onto a Masters course next year I decided to treat us both to a trip to Pompeii.
 Here is the birthday girl enjoying a hot chocolate on our arrival in Pompei town square. We had to have a hot drink because unfortunately for the first couple of days the weather was not wonderful.
 This was our first visit to Pompeii and it absolutely poured down!! We kept smiling though because despite the rain we were so amazed by the site. It is huge and having only seen the ruins in Rome before I could not believe that now we were walking down whole streets.
 Then every so often you would peer in a 'house' and see a frieze like this looking like it was painted a couple of decades ago. 
It is a truly fantastic place to visit.
You can find drinking fountains all around the site and place a hand on the same place as a Roman citizen as the stone is worn away where thousands of Romans leaned over to take a drink.
You can even cross the street using a Roman pedestrian crossing!
Of course we had to see one of the eerie victim casts. You can even see the markings of their clothing.
We had such a nice time not only doing the history and culture but having lots of girl chats and gossip!!
Plus the pizza was to die for and once the weather cheered up I was able to enjoy a glass or two of my favourite tipple, Prosecco.
I have had some time for a bit of mini shopping that I hope to be able to share with you over the next fe days. 
Plus work has continued on Flourish and Blotts. Lots of brick work and tiling. Not very exciting but sooooo time consuming.
Lastly, I have booked to go to the Making of Harry Potter Sudio Tour next Wednesday which is very exciting. I am hoping to get lots of inspiration and intend to take 100's of photos. Having seen some already I know there will be a thousand thoughts in my head when I come home!!
So, that's me. Now to catch up on some blog reading.

Thursday, 29 March 2012

New Kid on the Alley.......

A little while ago I discovered the wonderful characters of Jo Medvenics of Pocket Pygmies.
After seeing one of her commission pieces I asked her to make me a Hogwarts 6th former with attitude for my Diagon Alley.
I loved he way she had sat her commissioned piece and definitely wanted the same crossed leg pose.
As you can see I have exactly what I wanted and more!
A wonderfully crafted piece with all the fashion sense you could hope for in a teenage witch.
Isn't the hair just fabulous!
She also came with her own chair and all the necessary bits and pieces a serious student of magic would need, even her own frog to practice on. 
My Diagon Alley is set many years after 'He Who Must Not Be Named' so I feel sure that this girlie must belong to the family of Cho Chang.
Look at these shoes and stockings.
I just adore their drama.
Not sure where I am going to sit her yet, maybe practising outside 'The Leaky Cauldron'.
Now pop over to Jo's Etsy shop and enjoy looking at all her quirky and beautifully made characters.

Wednesday, 21 March 2012

Now Don't Breathe on My Staircase!!

As my Dad would say another day, another adventure or another day and back to the staircase.
The railings have stayed in place, no overnight pinging off so with the sun shining I carried it into the garden for spraying.
The husband was warned in no uncertain terms - Keep Away! Do not touch! Do not look! Don't even breathe next to it.......
 I put it back on the stand I had drilled yesterday and stood away ready to catch if it should fall. I then sprayed it all over with a coat of black paint. I had to leave this to dry for a couple of hours but as it was only an undercoat I could lay it down and go off and play tennis......
I lost, badly, my mind kept imagining the horror of coming home and finding it on the patio, on the grass, in the flowerbeds!
Black paint all dry I then sprayed on the gold crackle undercoat.
 Followed by the black top coat. Standing back I waited to see how it would crackle.
Can I come in the garden now? The husband is anxious to cut the grass. 
No you cannot. Can you imagine the tremors of the lawn mower!!??
 The crackle is quite fine which I good and I can't see any touching up that might need doing.
Ok, stand back and leave it alone.
 This is the spiral in place. I will need a circular step I think to bring it up level with the balcony above.
That's ok as I need to drill some holes to make it stand up properly and securely.
I will crackle this circular 'step' to make it blend in with the staircase.
 It is not a dominant as I thought it would be, there is plenty of room around it for all the bookcases that I hope to have lining the walls.
Now I need to pack it away, very carefully, and move on with the rest of the kit. 
I had to get the staircase finished in order for me to cut the balcony floor now I can start the wooden flooring and order the bookcases.
I had a chat with Rob of World of My Own at Miniatura at the weekend and he has agreed to make up my bookcases. This is great as it means they will have the fitted look I really want.
So a good day today.
Made even better as we found out today that my eldest son has been accepted on the graduate programme he applied for with a well known grocers.
He will be one of the lucky graduates this year with a job at the end of four years study.
Phew! Now that really is good news.

Tuesday, 20 March 2012

Spiral Staircase for Flourish & Blotts.......Decision Made at Last!!

I had a lovely day at Miniatura on Saturday looking at all the wonderful items on show. It did not seem as busy as previous fairs and there appeared to be fewer stands. Certainly there were far fewer European sellers and many of the UK artisans that I spoke to felt that the credit crunch was continuing to affect their sales.
I am certainly a different shopper than I was a few years ago but in a good way I hope! Not so many impulse buys that I regret as soon as I get home and a lot more thought and research.
There were lots of people with note books, also making sure they were buying exactly what they needed.
For all the artisans sake I hope all this thought leads to lots of post show sales.
One of the things I was determined to look at were spiral staircases. I had seen a few on line but as these were not cheap I had decided that I wanted to talk to whoever was prepared to make me one.
I knew I wanted a metal staircase and had looked at various kits on line for around £50 but most reviews seemed to imply that they were a nightmare to put together.
I talked to a few of the sellers about my staircase and got a couple of estimates but in the end I could not bring myself to invest the sort of money a handmade one would have cost.
So.............
 .........I came home and ordered a kit recommended by the ever helpful Michelle from Minimum World and it arrived this morning. When I opened the box I was quite heartened by how few pieces there seemed to be. It looked quite a simple procedure. The instructions were clear and the stages were few. 
 I drilled the holes for the central pole and first step to give the staircase a stable base. The first step slipped on easily and each step has pre-drilled holes for the next one.
 The first couple went on without a problem and I used a little bit of super glue to hold each one in place. 
 Now doesn't that all sound simple, and in reality it should have been but as I added more steps it became apparent that not all the pre-drilled holes matched the tabs on the bottom of each step. Plus if I wiggled them too much the tab would break off completely. This meant removing the step completely and rubbing down the sheared off metal. Hmmmm, a nuisance but still moving on nicely.
 The stairs are simply slid onto a metal tube one at a time and even without the railing look pretty good.
 The kit comes with 24 railings that slot into the two pre-drilled holes on each step. Having had a few problems with the other holes I took the time to rub down the tabs on each railing to make sure they would fit into the holes easily.
 The additional weight of the railings meant that my wooden stand could no longer hold the staircase straight and I became a little concerned that the whole piece would topple of my table and explode into a hundred pieces!
Once I started to try and glue the railing to the bannister it became obvious that falling off the table was the least of its problems. I was more likely to be thrown through the window and into next door's garden!!!!
This is a really fiddly stage and took simply ages. I could not work out the best way to do it. The bannister is in four pieces and I could not get them to line up properly and at the same time you have to make sure the railings stay in their groove.
Twice I walked away from it because of a very frayed temper and fingers covered in super glue.
Oh my goodness it has been a very long day.
 This is the finished, unfinished, staircase. Apart from the curly bit that goes at the bottom of the bannister but I didn't want to mess with it at this moment because I was waiting for the last of the glues to dry. 
It is far from perfect. The bannister joins are pretty awful and the sweep of the rail is not very clean. Some of the railing tabs snapped off as I was trying to fit the bannister rail so they are hanging rather than fixed but I have a spiral staircase.
Hopefully once it is painted, crackled and dressed with characters and books, all its many flaws will not be so visible.
I just hope it stays in one piece long enough for me to fix it in place!!!
The kit has cost a third of what I would have had to pay for a hand made piece with the extra step and postage. It has taken me almost eight hours and a tube of super glue. It still has to be painted and it's not perfect by any means.
Do I feel a sense of achievement? Am I pleased to have saved the cash?
Ask me tomorrow, or next week.
 Or better still ask my husband when the credit card bill arrives this month!!