Thursday 29 October 2015

Making Trees Using Wire for My Mad Hatter Project....

Another method for making trees that I have come across uses wire in lots of different thicknesses. Lots of very good tutorials can be found on my Alice board on Pinterest.
I have been collecting jewellery wire on the advice of Nikki Rowe who used to make the most stunning wire fantasy pieces. The thicker green stems were cut off some old artificial flowers a few years ago and kept because that's what we do, at last I have found a use for them!
 I have started to build up the trunk using the thick green stems by simply twisting the covered wire around a central stem.
 I keep adding to thicken the main trunk.
 As I build up the trunk I start to let some lengths become the upper branches of the tree. Using a thinner wire I have added some extra branches to the upper portion of the tree. 
It is quite a good idea to have a pointed pair of pliers to help with the twisting and adding of wires to save fingers.
 I checked the height and shape in the room box and think this will work once the leaves have been added. I might add some extra branches for shape.
 As this wire was pre-wrapped I have given it a good coating of PVA ready to paint. My plan was to simply paint the wire and see how effective it looks but after being give a few tips by miniaturist Susan Wener of Tabitha Corsica I might add some clay for additional bark effect as I am worried this tree might end up looking like a pineapple tree.
 I have also started some smaller structures using much finer wire.
 This will be a much smaller tree that I will just paint and add leaves. I have not been too worried about adding bases or roots because all the trees will be at the back of the flower beds.
 These armatures will have much finer branches but goodness getting the shape you want certainly takes some time and is painful for your fingers. I have used much more wire than I imagined too so had to trot off to Hobbycraft today for extra supplies of wire and clay.
A lot of the tutorials suggest using Super Sculpey clay but this is very difficult to source where I live and I am not sure it will make much difference to my efforts to be honest. If I decide to try it out I will have to buy it on the Internet, my local Hobbycraft does not stock it unfortunately.
I will have a go with the Fimo though as I think this might be an easy option for the spindly, tall tree trunks. 
My Creative Paperclay trunks have not dried out completely yet but they do not seem to have cracked. Sore fingers crossed!!


Wednesday 28 October 2015

Beginning to Make the Trees for the Mad Hatter's Tea Party......

After painting the back walls of the room box I have not been able to resist starting on the interior garden scene. I have used a ready made sheet of railway scenic materials for the 'lawn' on top of the floating shelf. This is quite basic at the moment but I will dress it up as the project progresses. 
Making the trees is quite a daunting task so I have collected together a number of tutorials in my Pinterest Alice In Wonderland board that I have read and read.
I have started with a basic shape and armature made from tin foil. I have then covered the tin foil with basic masking tape to hold the shape. 
 I have covered the wrapped armature in the basic air drying clay you can get from Hobbycraft. 
This tree is going to sit in a back corner and will go right to the top go the 'ceiling' and hopefully create a green canopy with the other tall trees.
Using a cocktail stick I have tried to create a bark effect along the trunk and branches. The immediate result was quite effective and I have to keep telling myself that foliage and my caterpillar will be hiding quite a lot of it so leave it alone and move on. 
 After leaving it to dry overnight I notice a fair amount of cracking this morning. So I have added a thin layer of new clay to hide these cracks but even if there are any more cracks I think the final coats of paint will help to hide damage.
I am going to place my caterpillar under this tree on top of a small mound. I want to give him some height so that he can be seen and not get lost at the back. 
This tin foil will form the basic shape.....
 ........and I have covered it with masking tape for either covering with soil or grass, I haven't made my mind up yet. The tree is a good fit behind so one down and quite a few to go.
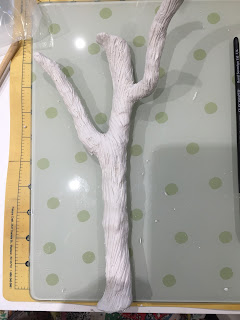
Using the wire armature technique this time I measure and wind three long strips to make some plain tree trunks that I hope will give an extra dimension to the feeling of forest height to the room box. 
I have used wire from the jewellery supplies section of Hobbycraft but lots of people use stripped electrical wire which may work out cheaper and of course there are a whole range of floristry and sugar craft wires.
 This time I have used Creative Paperclay, which is quite a bit more expensive than Hobbycraft's own brand, but I wanted to see what difference it make make to the overall finish.
I also covered the wire in masking tape before adding the clay.
 What I haven't done with either methods is use ant PVA glue to help the air drying clay stick to the masked armatures.......Hmmmm, I think I was supposed to but the worst that can happen is that the clay, once it dries, comes away from the frame. As my trees are only going to be seen from the front and side it shouldn't be too much of a disaster.
I have tried to vary their shapes and thicknesses, these will be my largest trunks I think, and again weathered the bark. I will have to give them at least a couple of days to dry completely before painting.
I am planning to give the clay a first layer of Gesso primer before starting with the acrylic paint but if anyone knows a better way of preparing the clay for painting I am definitely all ears.
Looks like rain here again tomorrow which means I should be able to spend another day in the workshop playing with my toys.
Well, what else can a girl do on a rainy day?

Wednesday 21 October 2015

Getting Going With the Mad Hatter's Room Box......

If there is one thing I have learnt when starting a project it would be that forward planning is essential, even with what appears to be a straight forward room box. I want to make sure that I have a clear idea as to what will be required to enhance and disguise before I start all the interior pretty bits. 
The floating lawn area has required an additional strip of wood to be cut and this needs to be in front of the front perspex sheet. 
It seems ridiculous to actually mention such an obvious adjustment but there have been many occasions when I have gone along merrily and realised too late that pieces have been glued down in totally the wrong place or I have had to add bits at the last moment because I didn't take the time to think things through.
 I have also cut all the mouldings for both sides, the front and the top even though I will not be gluing down any of the front and top pieces until the whole project is finished. This enables me to paint everything at the same time and I won't run out of the particular shade of grey I have opted for and all the wood with receive the same treatment at the same time.
 I used a basic mitre box and hand saw for the mouldings and was pretty pleased with the results. 
 The top of the box has a large perspex sheet which will be edged by a cornice moulding but the front edge sat too low to add any support to what will be a long piece of cornice and a join. This has meant my adding a long strip to the edge of the perspex to support the cornice and front moulding.
 While waiting for coats of pain to dry I started to play with the interior walls. Although there will be three flower beds I needed to add a background for the planting. I am not very confident with a paint brush so started with a very basic blue sky and green bushes.
I then started toning down the sky by adding dollops of white paint to my basic blue a bit at a time and just layering on different shades of paler blue.
I repeated the same process with the green bushes but in a slightly more dramatic style.
Four differing shades of green and my background is ready for the planting to begin.
I am going to have a try at making some tree trunks out of Fimo and air drying clay for a more woodland feel and give the idea of height. The actual scene is eleven and a half inches high, so eleven and a half feet in twelfth scale, so I can get away with some tall trunks suggesting much taller trees surrounding the Tea Party. 
I need to do a bit of research on how to do it but as the will be flat backed I am hoping to do all the work on my glass tiles which will make the sculpting slightly easier........famous last words I know!!
So lots of moulding to paint but moving along nicely at the moment.
Rainy days are great for getting stuck in to a new project!

Monday 19 October 2015

Here We Go! New Project Down the Rabbit Hole.......

When I first started this wonderful hobby I spent a lot of time in Blogland reading and learning from the many artisans and home miniaturists that posted about their wonderful creations. One day I came across a truly inspirational setting by the miniaturist Susan Wener of the Mad Hatter's Tea Party. 
I decided that one day I would attempt my own tea party and for a number of years I have been collecting the relevant characters by Jain Squires both from fairs and with a little help from my friends.
Well at last the time has come......
 It will be a room box scene to go in my newly vacated bedroom, my youngest son has recently left home, that I have been de-cluttering and re-dressing for the last couple of weeks. Big clearing out and lots of bags to the local charity shop!! 
I like the projects I have in the house to match the room they will be placed in so the exterior of this room box will be soft greys and creamy chalk paints with an Alice quote or two, maybe.....
 This is quite a large room box, as usual my plans seem to grow and grow, that I had made by a very helpful man at Dolls House Concepts. I sent my measurements to Ted and he made exactly the size I asked for at a very reasonable price. The really cool thing about their range of room/display boxes is the fact that they have a perspex ceiling which means that the project can be seen from above as well as from the front. The perspex roof will also allow for much more light to enter the box, especially at the back. 
The back and side edges will hold all the flowers and bushes that I intend to make myself from the huge number of kits I seem to have collected. I love the planning stage and spend a lot of time thinking things through to try and avoid problems as the work progresses. In order to create the flowerbeds I will need a good layer of 'soil' because the stems will need to be planted so I have drawn a shape for a floating floor/lawn. 
 All projects start with an undercoat for me. This seems to give a good base surface and prevents warping. I have also primed all the wooden trims and mouldings I will also be adding to the exterior.
 I use a very cheap all purpose paint from B&Q so it can be used over and over again.
The floating lawn has been built with a variety of wood off cuts and then primed. Once I have finished messing about with the exterior walls I will cover this with a grass sheet purchased from a model railway supplier. 
Having raised the floor level I have had to add an extra piece of wood to the front to hide the gap. 
Now I need to plan the mouldings for the case of the room box and then start mitring, definitely not one of my favourite jobs especially where cornices are involved.